Transformations Microservice
Note
Available in the Enterprise version only.
An optional ecos-transformations microservice for generating documents from templates, which can be loaded with a project or added through administrator tools.
Connecting the Microservice
Transformations Microservice (ecos-transformations) is a standalone microservice that does not require deploying additional databases (all templates are stored in the ecos-model database). The following are required for it to function:
ecos-model:2.13.0
Connection Parameters via docker-compose.yml
    #=== TRANSFORMATIONS ===#

transformations-app-dev:
  container_name: transformations-app-dev
  image: nexus.citeck.ru/ecos-transformations:1.0.0
  ports:
    - 8087:8087
  environment:
    - _JAVA_OPTIONS=-Xmx256m -Xms256m
    - SPRING_PROFILES_ACTIVE=dev,swagger
    - ECOS_INTEGRATIONS_ONLYOFFICE_HOST=only-office-app
    - ECOS_WEBAPP_RABBITMQ_HOST=rabbitmq-dev
    - EUREKA_CLIENT_SERVICE_URL_DEFAULTZONE=http://admin:$${jhipster.registry.password}@ecos-registry:8761/eureka
    - SPRING_CLOUD_CONFIG_URI=http://admin:$${jhipster.registry.password}@ecos-registry:8761/config
    - ECOS_INIT_DELAY=0
  depends_on:
    - ecos-registry
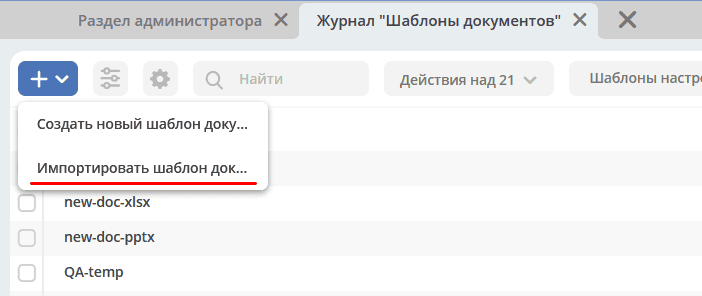
Creating a New Template
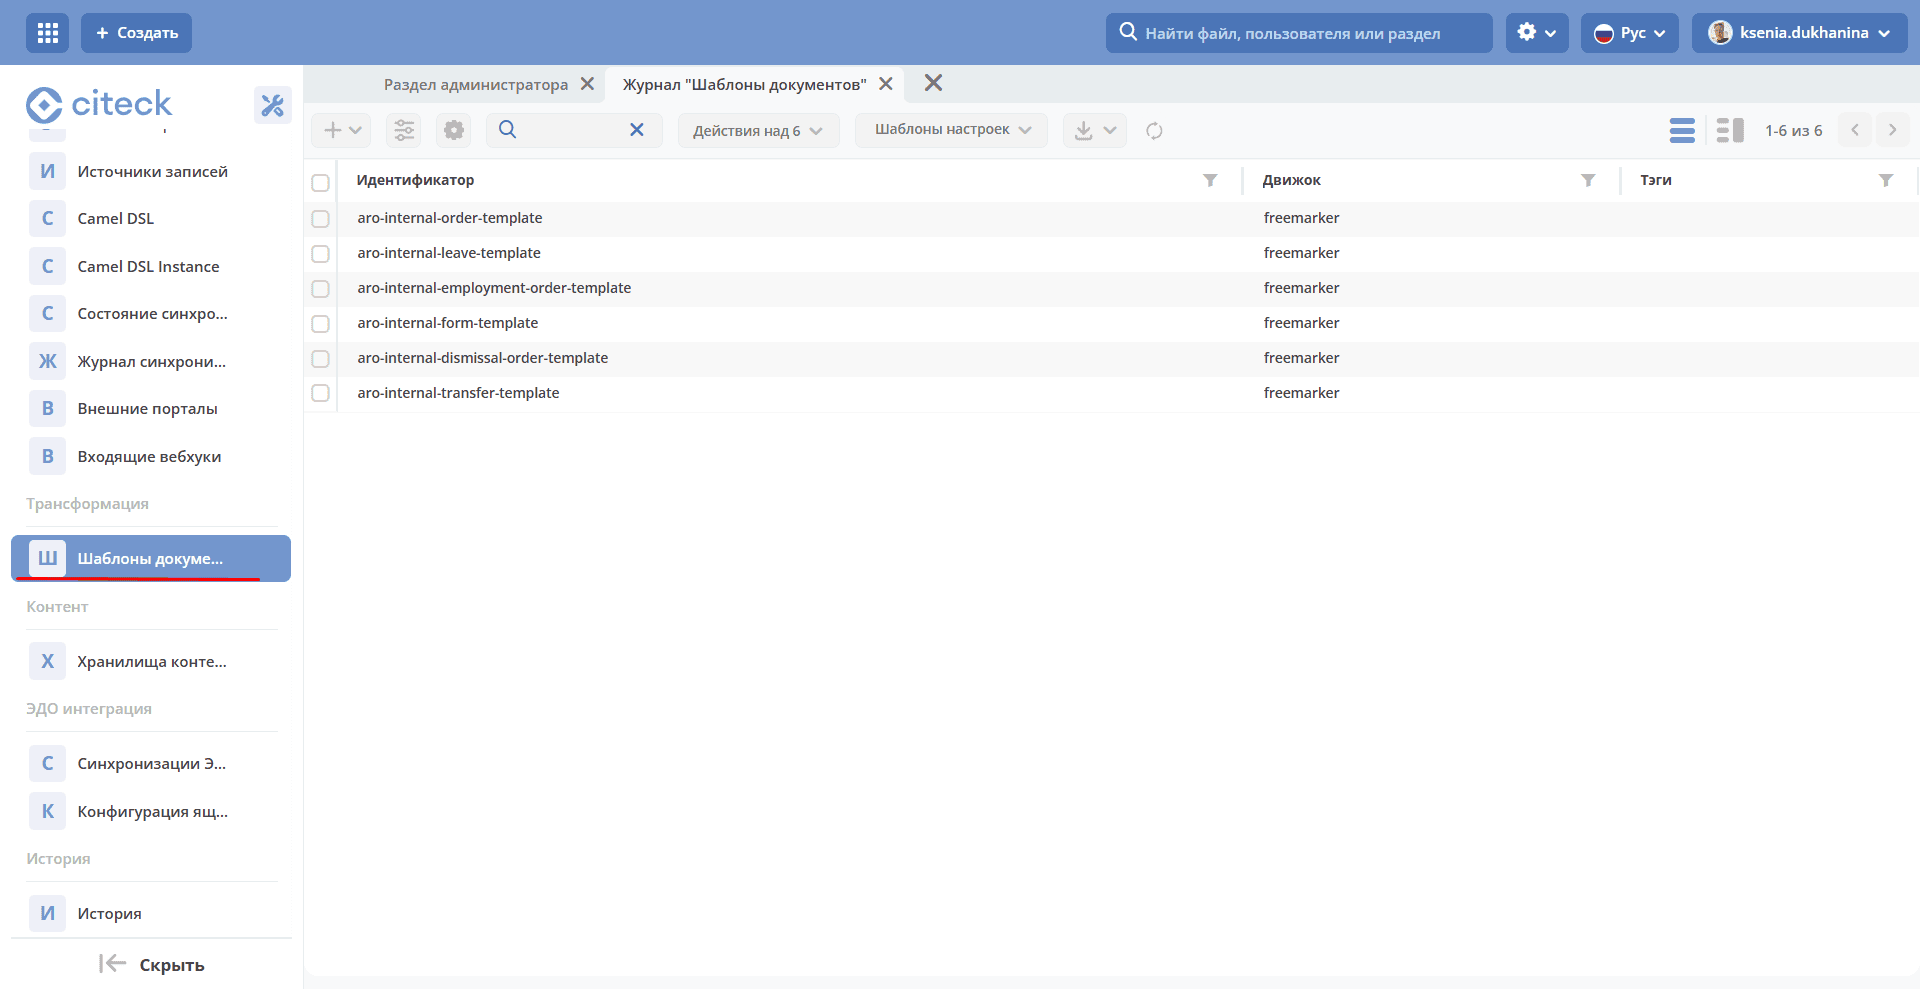
To work with new document templates in Citeck, there is a journal “Document Templates” (Workspace “Admin Section” - Transformations):
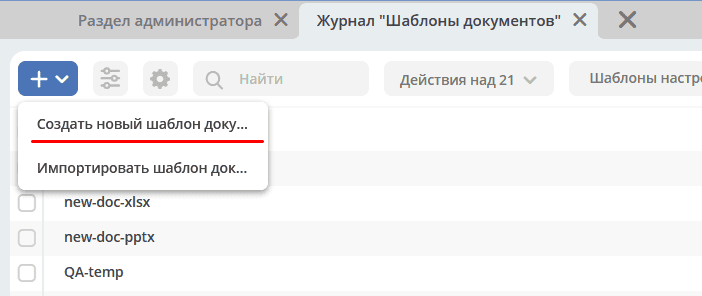
There are 2 ways to create document templates in the system:
By placing them in the project in a specific directory.
By uploading them through the Add action in the Document Templates journal.
Creating a Document Template in a Project
To successfully add your template to the system, there are several things to keep in mind:
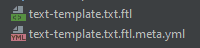
Along with the template itself, a
meta.ymlfile must be stored to hold the template’s meta-information.File naming convention:
If there is a single template file, the meta-file is named according to the pattern
${Full_file_name_with_extension}.meta.ymlExample:
If there are multiple template files as a result of splitting them by locale, the meta-file is named according to the following pattern
${File_name_before_locale_specification}.meta.ymlExample:

Meta-file Structure
The meta-file must contain the following fields in its structure:
Field
Description
id
Unique identifier of the template in the systemid: test-template
engine
The name of the engine that will handle template fillingAvailable engines:-freemarker— для формирования документов в формате docx, txt с обработкой Freemarker.-ecos-table— для формирования xlsx таблиц, которые поддерживают обработку Freemarker-none— для обработки шаблонов без какой-либо трансформации. Возвращается шаблон как есть.engine: freemarker
name
Template namename: TestTemplate
mimeType
Template file typemimeType: application/vnd.openxmlformats-officedocument.wordprocessingml.document
model
Represents a key-value map where the key is an attribute from the template and the value is an attribute taken from the record.model: regNumber: registrationNumber regDate: registrationDate|fmt('dd.MM.yyyy') initiator: initiator.firstName
The values support all attribute access capabilities through Records APIcomputedAttributes
Computed model attributes.Defined as a list of attributes.Before template generation, transforms the received model attributes according to the transformation type.computedAttributes: - id: docInvestigationInfo type: html-to-text
See also Computed Attributes for Templatestags
A list of auxiliary labels for convenient searchtags: - Template - Test - Example
Example:
  ---
id: test-docx-template
engine: freemarker
name: TestDocxTemplate
mimeType: application/vnd.openxmlformats-officedocument.wordprocessingml.document
model:
  modelValue: ?disp
Files must be placed in the project at a specific path.
The file path follows this pattern:
In the microservice:
${home_dir}/src/main/resources/eapps/artifacts/transformation/template/In legacy projects:
${module_name}/src/main/resources/alfresco/module/${module_name}/transformation/template/You can create an internal folder structure within these directories. Template artifact lookup is performed recursively through subfolders, but starts from these directories.
Creating a Template via the Journal
To create a document template, navigate to the “Document Templates” journal (Workspace “Admin Section” - Transformations) and create a new record.
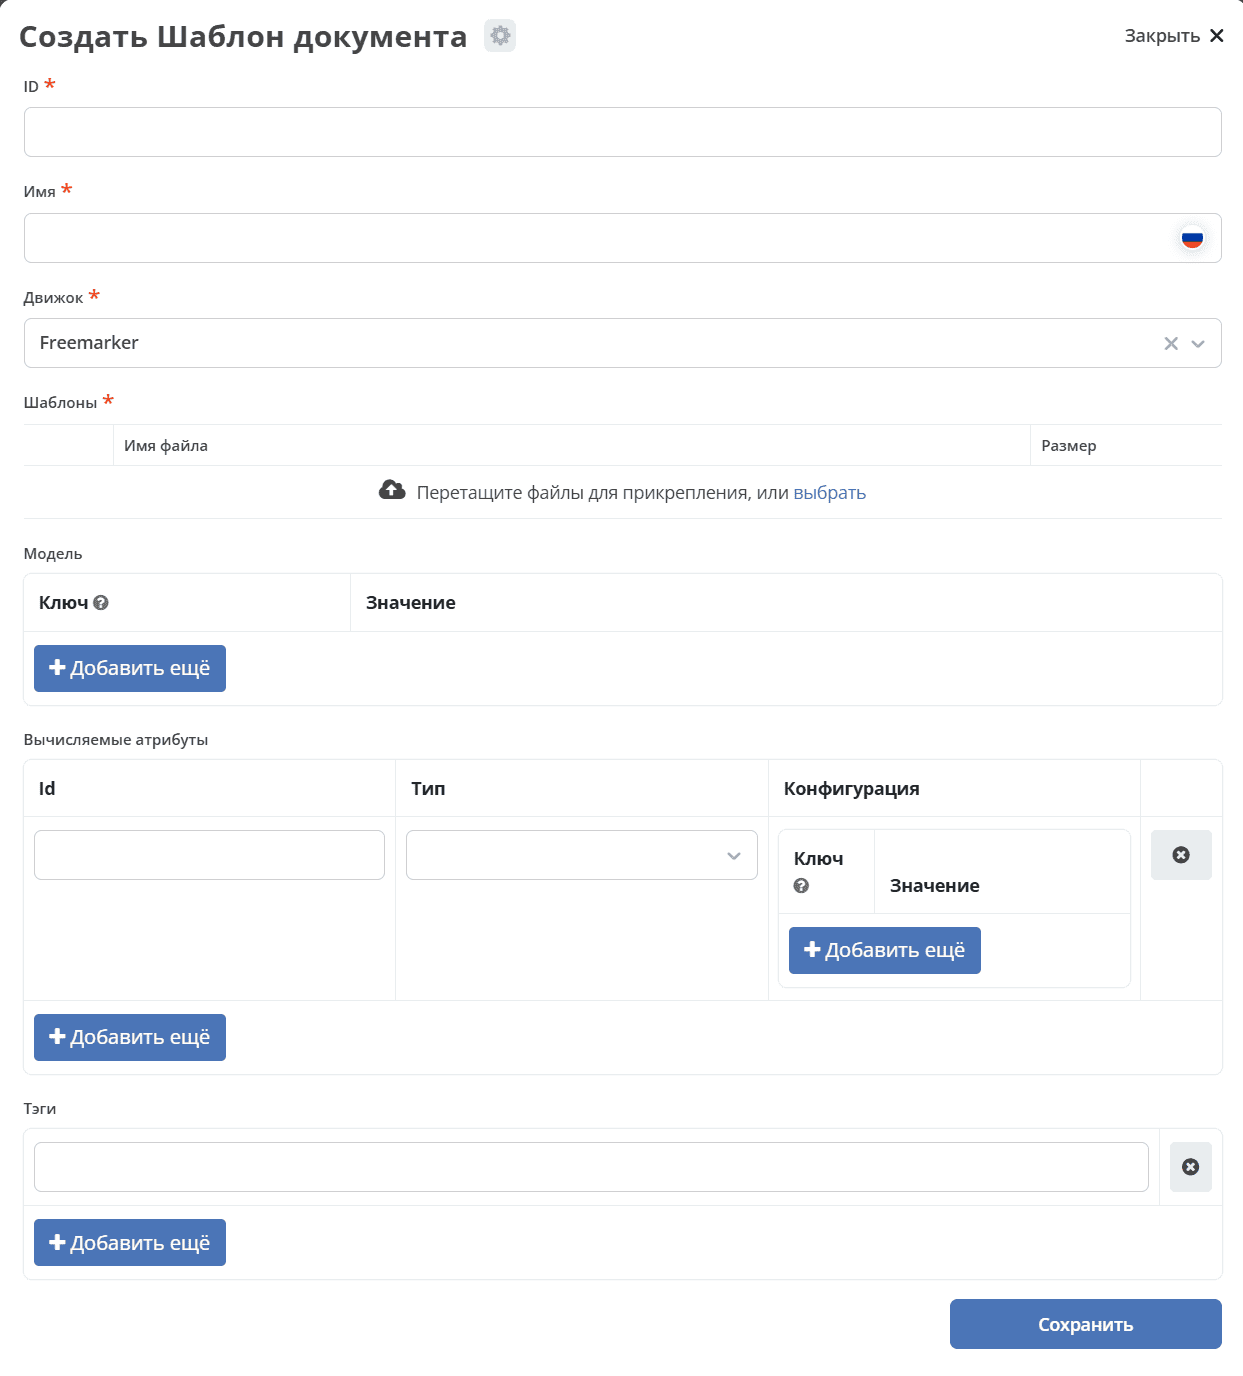
The following fields must be filled in:
Field |
Description |
|---|---|
ID |
Unique identifier of the template in the system |
Name |
Template name |
Engine |
The name of the engine that will handle template filling
(Currently, only Freemarker is available)
|
Templates |
The template file is uploaded
The template must be added in a zip archive (since this is how templates are stored in the database).
The archive must contain a template file in docx or ftl format. There are no strict naming rules, but it is recommended to follow the general convention and name the file after the template ID.
If there are multiple templates (split by locale), the file names must have suffixes such as _ru, _en, etc. appended at the end.
|
Model |
Represents a key-value mapping where the key is an attribute from the template and the value is an attribute taken from the record. |
Computed Attributes |
A list of objects containing information about computed attributes.
See also Computed Attributes for Templates
|
Tags |
A list of auxiliary labels for convenient search
See also Computed Attributes for Templates
|
Computed Attributes for Templates
Computed attributes in the template meta-file are intended to perform post-processing on values received in the model, and to update these values in the model or add them under new names.
Record Structure:
Computed attributes are specified starting with the key attribute computedAttributes in the root structure of the meta-file, which contains a list of objects of the following form:
Field |
Description |
|---|---|
ID |
Unique identifier of the attribute. The attribute will be added to the final model under this value.
If the model already contains an attribute with this name, its value in the model will be updated.
|
type |
Specifies the type of value transformation. |
config |
Represents a key-value map of additional configuration parameters and their values.
config:
  attribute: test1
Has a common parameter for all types —
attribute. This parameter accepts the name of the attribute whose value will be used for transformation.If this parameter is not specified, the value will be taken from the model using the attribute name from the id field of the computed attribute.
|
Example:
model:
  test1: ecos:text1
  test2: ecos:text2
computedAttributes:
  - id: test3
    type: html-to-text
    config:
      attribute: test1
  - id: test2
    type: html-to-text
Computed Attribute Types
Type |
Description |
|---|---|
html-to-text |
Converts input text from HTML code to plain text by removing unnecessary tags (such as <p>, <br>, <li>). |
Generate and Download Document Action
The system provides an action that allows generating a document from a document template based on a record and immediately downloading it. To do this, create a new action (see: actions) of type download-by-template.
For the action to work, the following attributes must be filled in the action configuration:
Attribute |
Value |
|---|---|
resultName |
The name of the resulting document.
resultName: 'test-docx.docx'
If this attribute is absent, the template document name will be used.
|
templateRef |
Reference to the invoked template
templateRef: 'transformations/template@test-template'
|
How it works:
When the action is invoked from the record’s action menu, the system sends a request to the template, retrieves the model from the template, fills it with the corresponding values, and sends all data to the transformation microservice, where a document is generated based on the model and template and returned to the UI for download.
In TemplateServiceImpl, before passing the data model to the template engine, recursive sanitization of all string values is implemented. Control characters u0000, u0008, u000B, u000C, u000E, u001F are removed from strings. Allowed characters — tab, newline, and carriage return — are preserved.
Sanitization is centralized and covers all template types (DOCX, XLSX, text).
Note: if encrypted fields are used (encrypted in the database and decrypted on the client side), such fields will be passed in decrypted form and will be displayed correctly in the generated document.
Action examples:
---
id: download-by-test-template
type: download-by-template
config:
  templateRef: 'transformations/template@test-template'
---
id: download-by-test-docx-template
type: download-by-template
name:
  ru: Скачать DOCX шаблон
  en: Download DOCX template
config:
  templateRef: 'transformations/template@test-docx-template'
  resultName: 'test-docx.docx'
Template Import/Export
Template import and export makes it easy to transfer document templates between environments. You download the required templates from one environment and import them into another. You can also generate a template archive yourself and import the desired template into an environment in one simple action.
During import/export, you work with a zip archive containing the template’s meta-information and the document template itself:

Import
Templates are imported via the Import Document Template creation option in the Document Templates journal:
To import, attach a zip archive with the following files:
A file with the template metadata. The file name must follow the pattern: File_name.meta.yml
The template itself (or templates with different localizations).
Important
This is exactly the archive created during template export
Export
Export is performed using the Download action when hovering over the required document template.
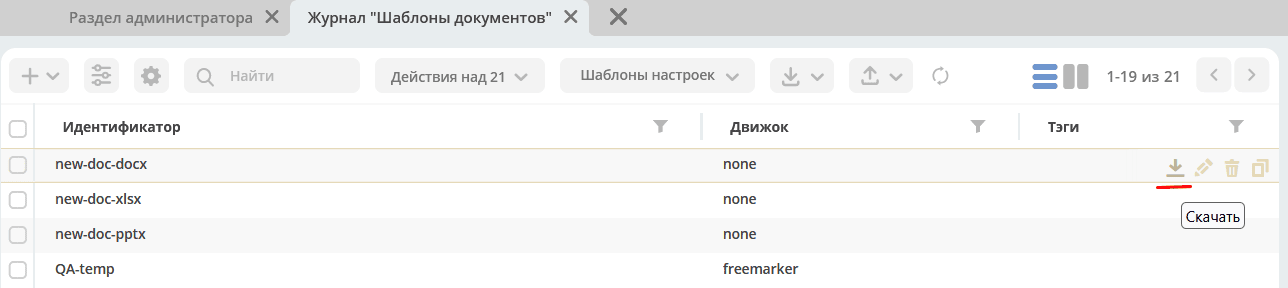
After clicking the action, a zip archive containing the template and its metadata will be downloaded.
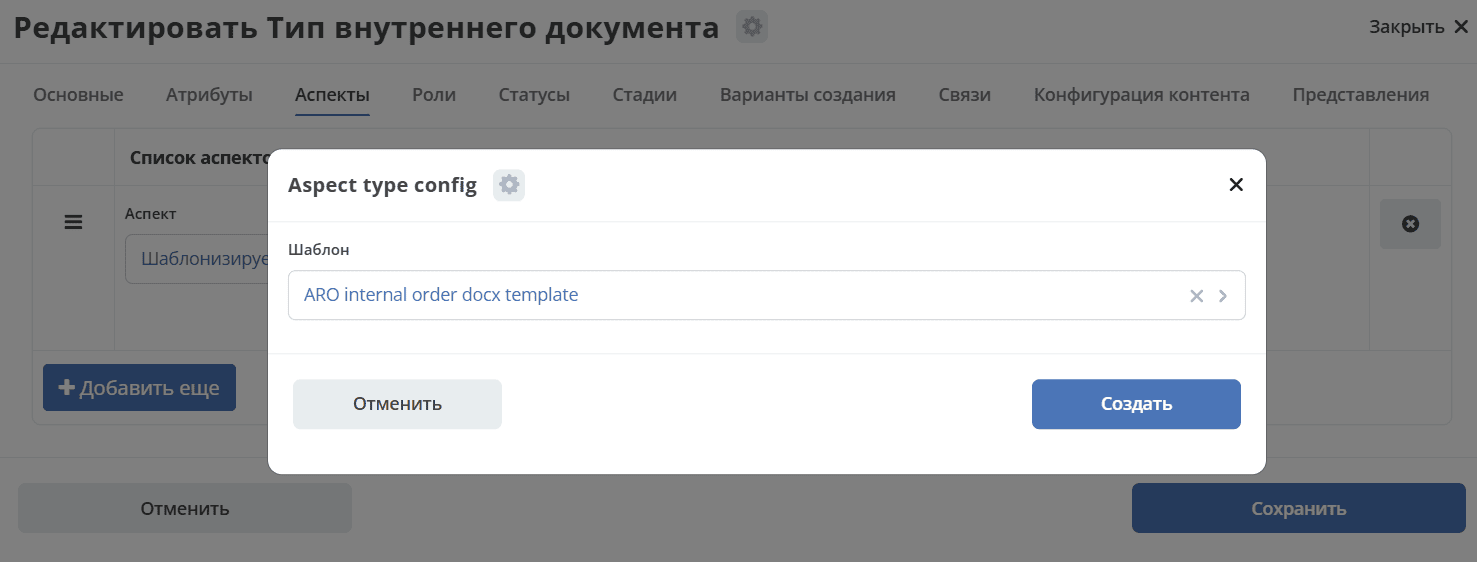
Automatic Content Generation from a Template
For automatic content generation from a template when creating a record, you need to:
Add the aspect
templated-contentto the data typeSelect a template in the aspect configuration:
Note
If the templated-content aspect is enabled when creating a record but automatic generation needs to be disabled, you can set the templated-content:autoGenerate attribute to false.
When a record is created, automatic generation is performed synchronously, and the result is written to the _content attribute.
The generated content will be available for download, preview, and version comparison.
Conditional Statement Syntax
The logic from the DocxFreeMarkerProcessor class of the ecos-community-core project has been migrated to the transformation microservice. It is located in the DocxFreemarkerTemplateService class.
Pay attention to the service description, specifically to the syntax of conditional statements:
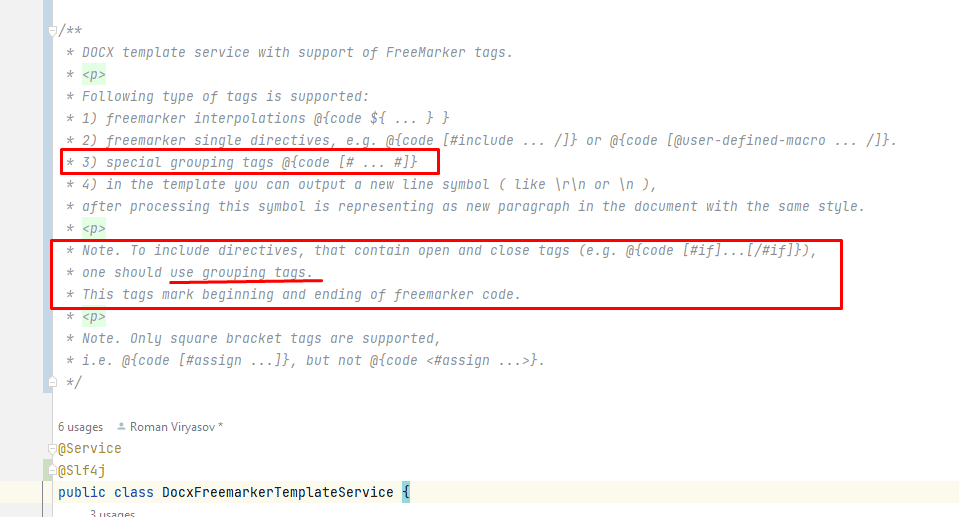
Expressions that contain opening and closing tags must be wrapped in grouping tags [# #]:
Parameters for Working with Documents in the Built-in OnlyOffice Editor
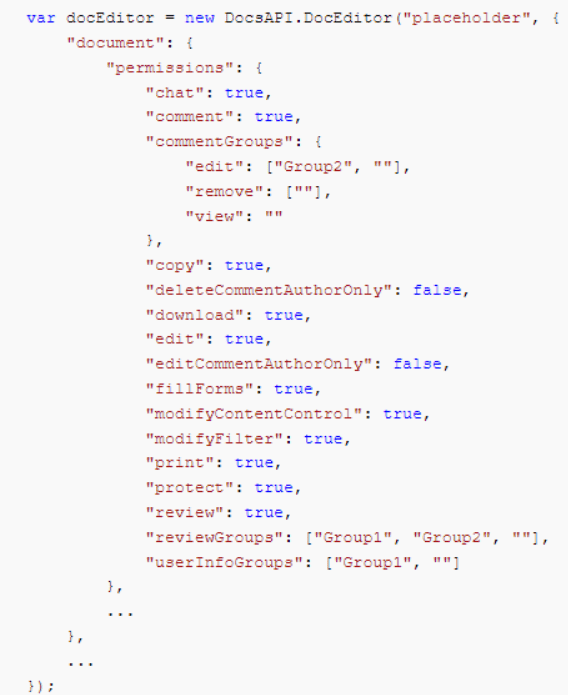
In the action, in url, specify the config via “&config=JSON”, having first generated it using encodeURIComponent directly in the browser:


In this example, we allow the user to edit only specific fields while removing the ability to download the file.
Editor configuration options are described in the official documentation
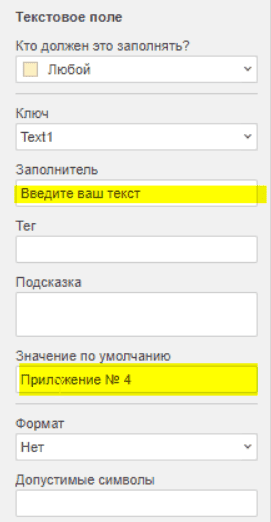
To create a document with editable fields, open the source .docx file locally in the OnlyOffice editor and save it in .docxf format

Open it in this format and mark the required fields using the Forms → Text Field tab.
Make sure that “Placeholder” and “Default value” are empty (to avoid layout issues and text color changes after template generation).
After marking the required fields, save the document again in .docx format, open it in Word, fill it with the necessary tags, and save:
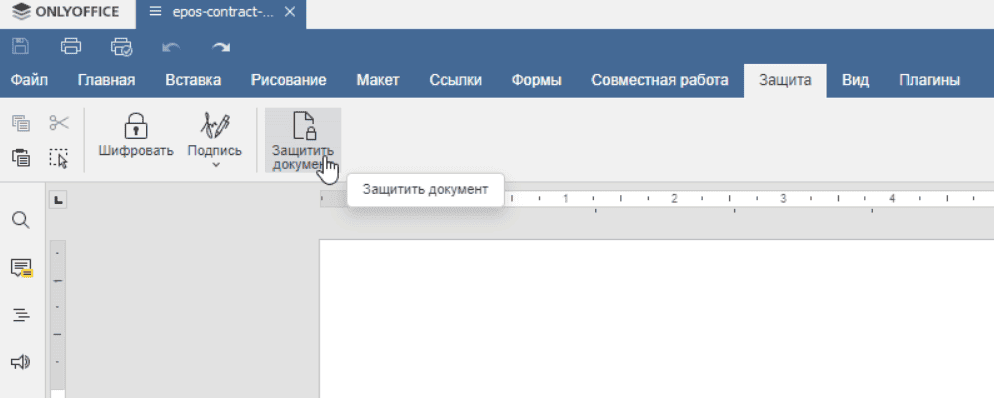
Then open it again with OnlyOffice and go to the Protection → Protect Document tab:
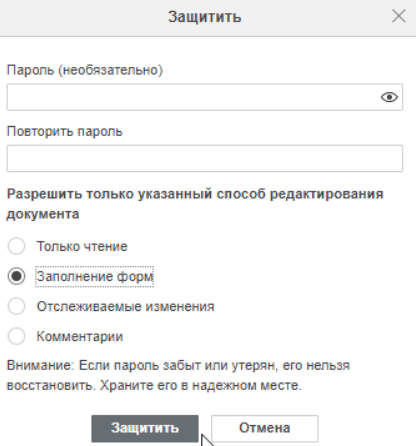
Specify a password and “Fill in forms”:
The result is a ready .docx file, which should be fixed before uploading to the system by following the article Temporary Workaround for Template Generation Error with Conditions
Temporary Workaround for Template Generation Error with Conditions
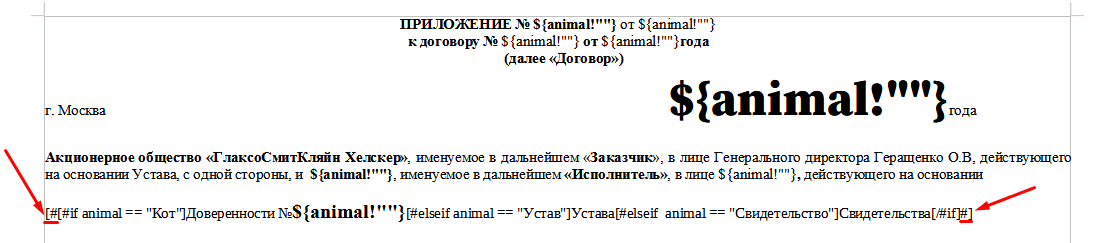
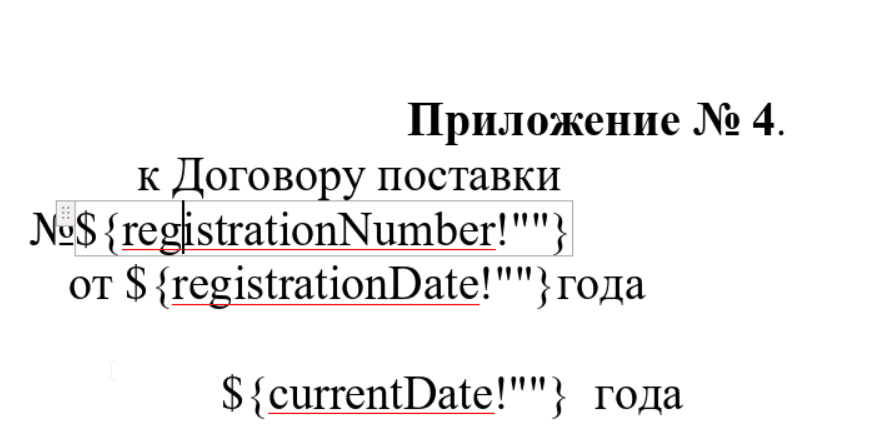
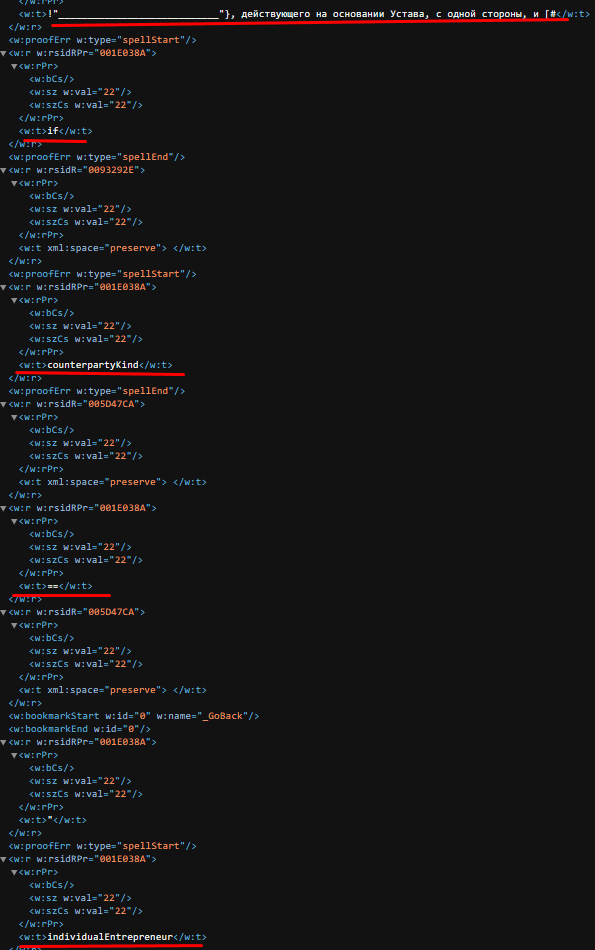
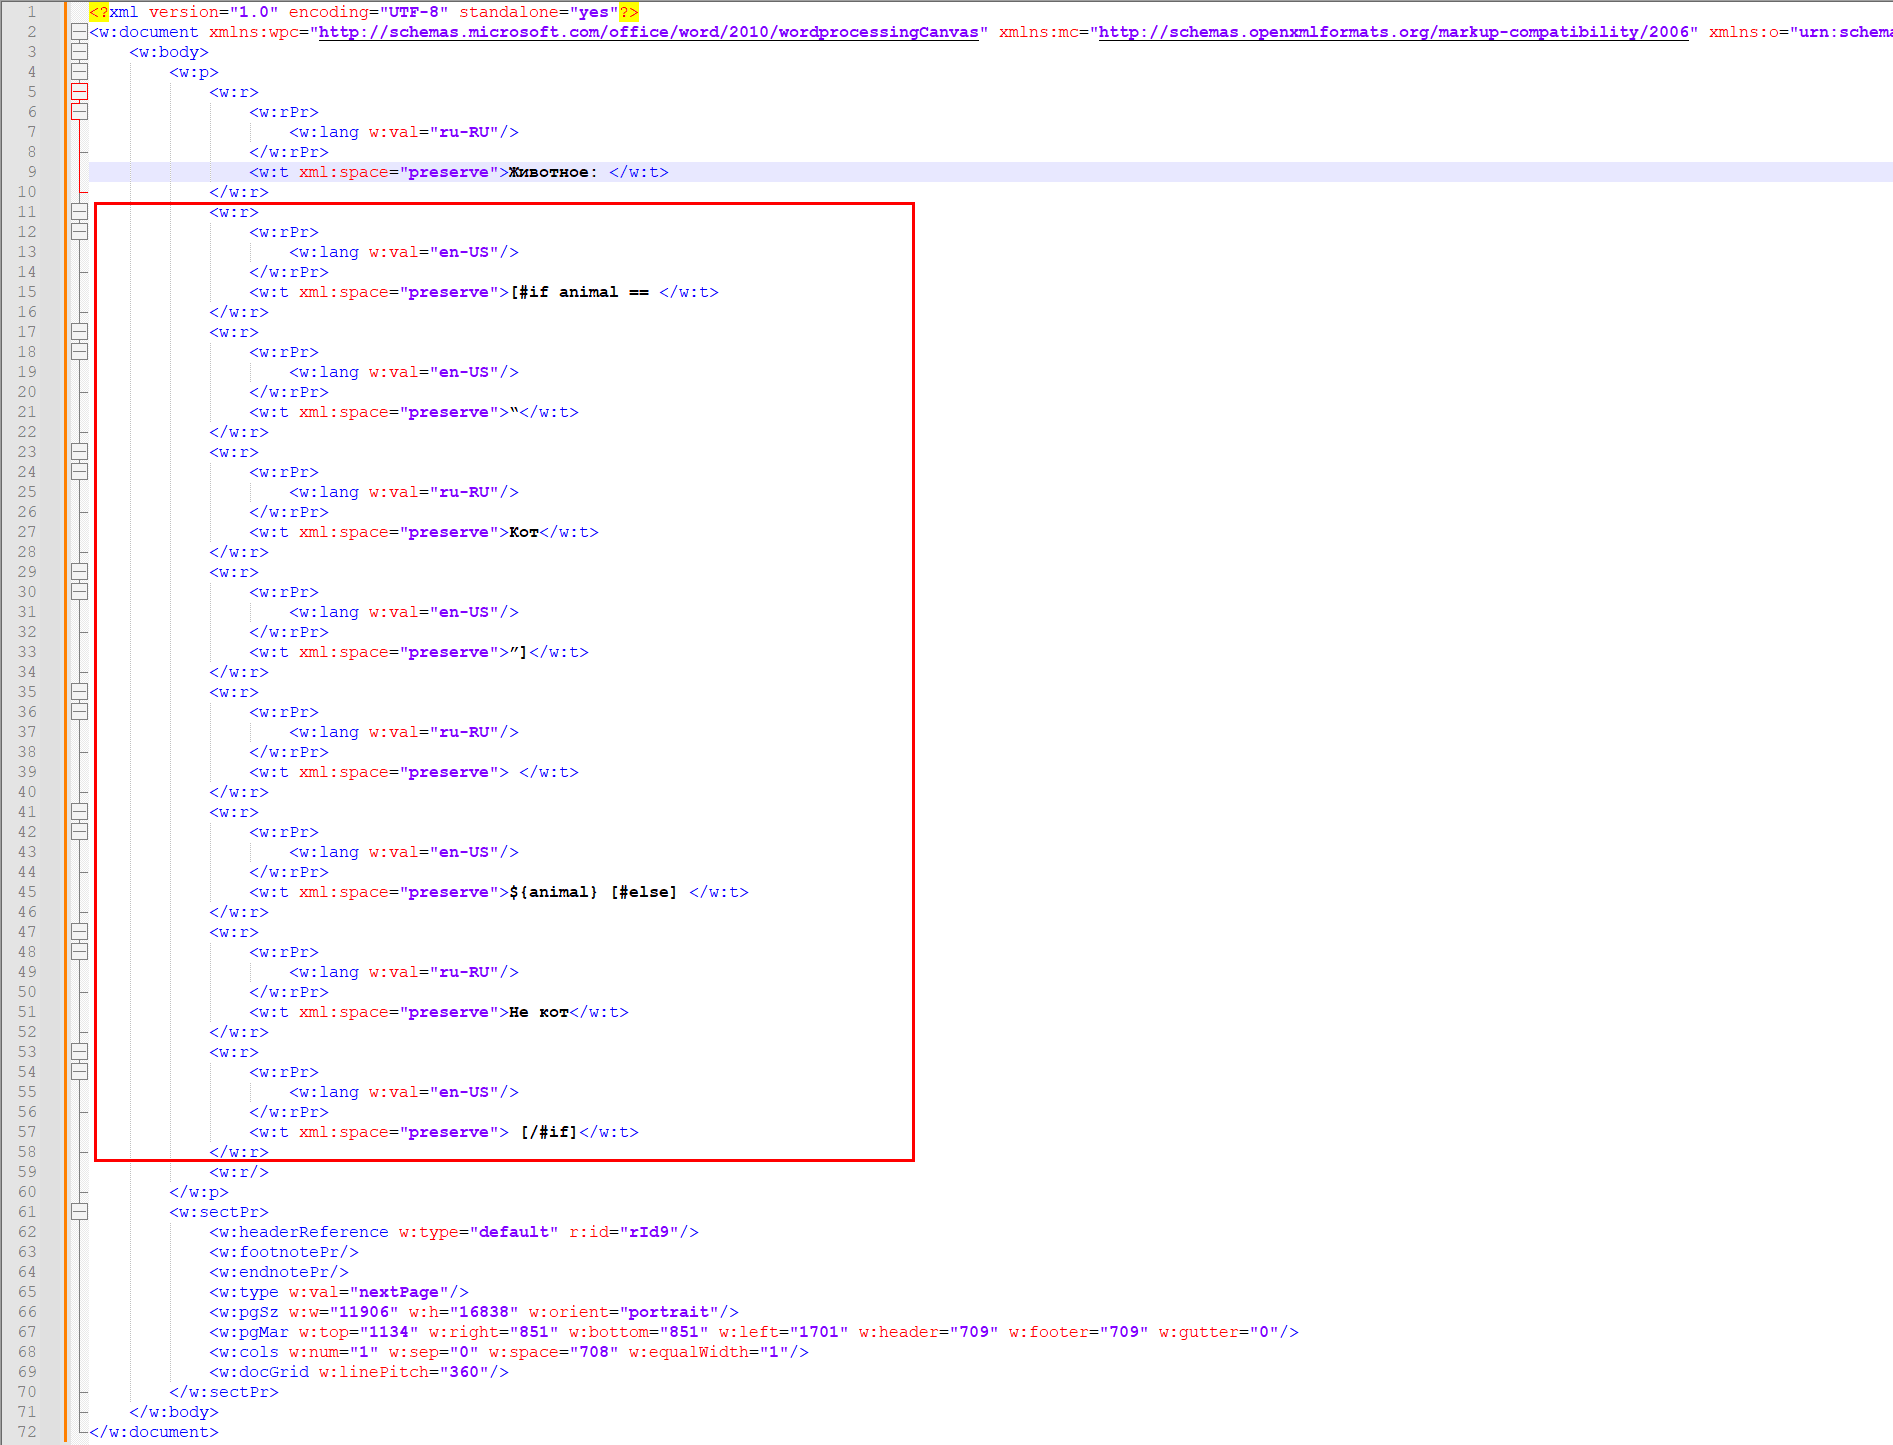
When generating a document from a template that contains a condition (i.e., if, else, or elseif), an error occurs.

because the document.xml file splits the condition into multiple tags:
Workaround for the issue:
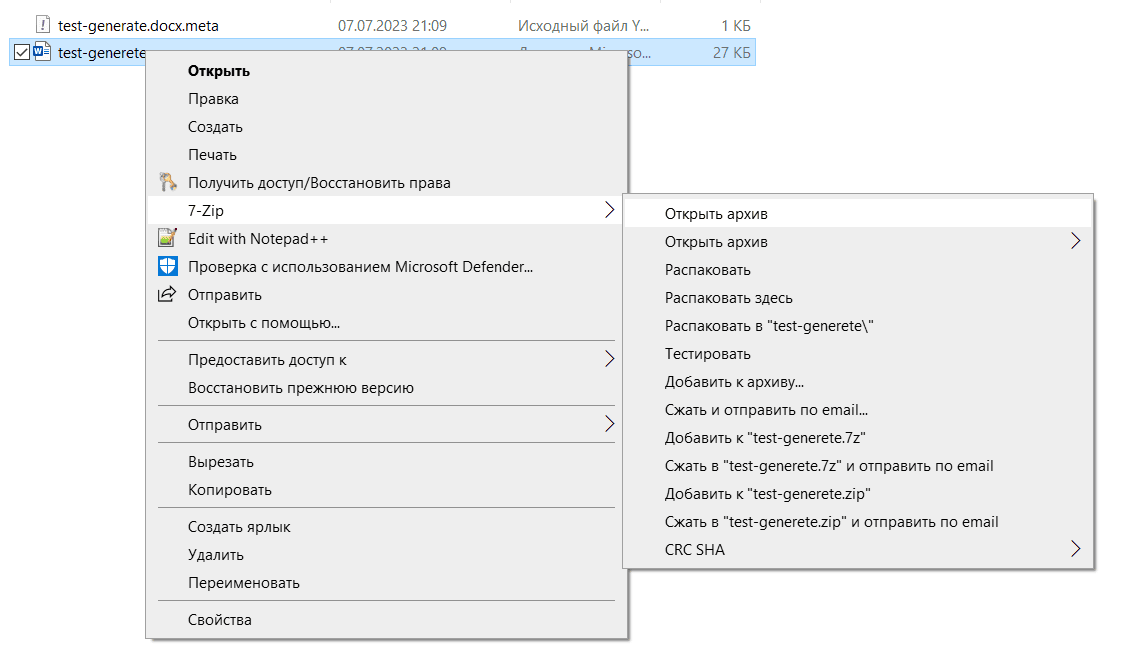
Open the docx file as an archive.
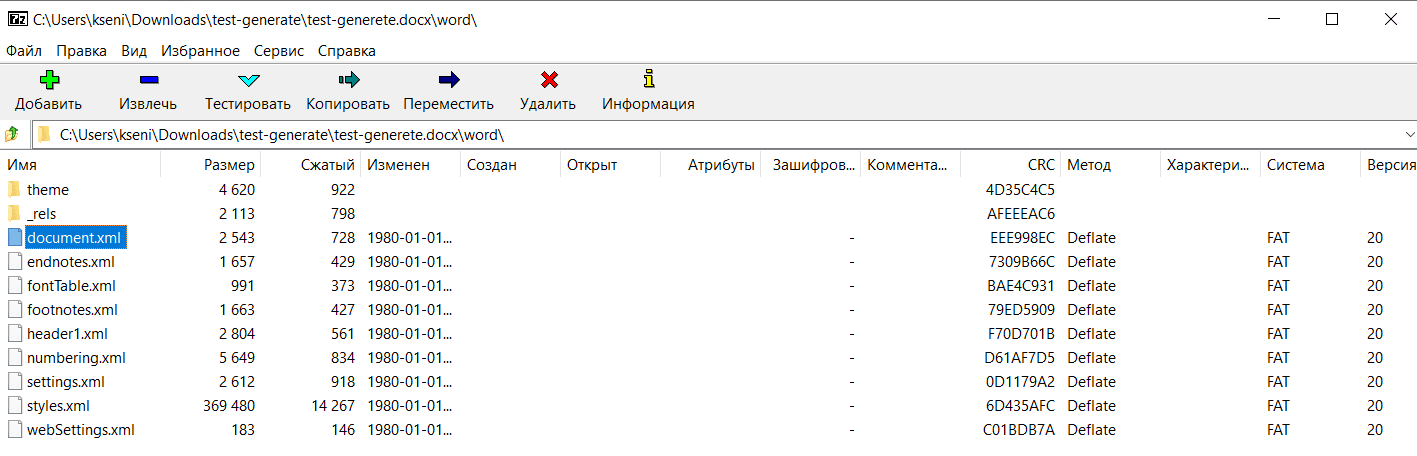
In the word folder, open the document.xml file
Find the condition split across tags:
Merge into a single tag:
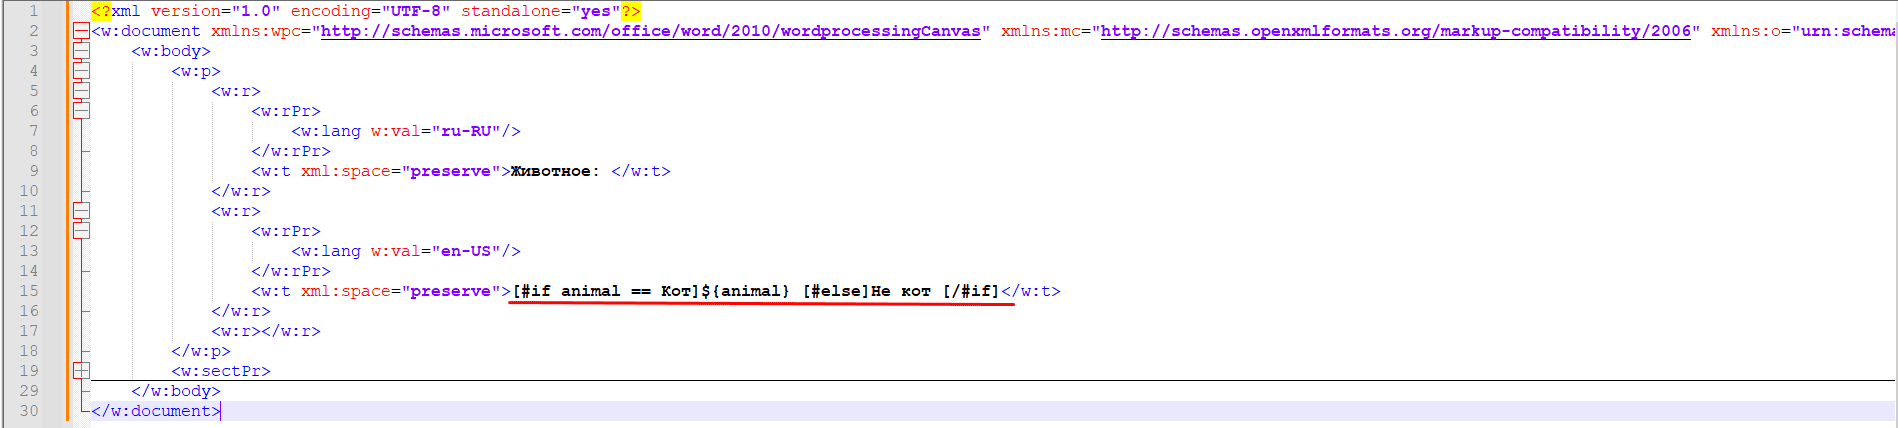
Save. Upload.
“ECOS table” Engine
This engine in the Citeck system is used to work with document templates in xlsx format. The engine is a combination of an xlsx file processor and a Freemarker processor, providing the following capabilities:
use of full Freemarker syntax in cells to fill them with values;
use of a special syntax for generating rows in the xlsx file.
General engine operation principle:
scans all pages of the template, replacing cell values with model values where necessary, using the Freemarker processor;
when rows with a specific syntax are found (for generating new rows), it begins generating new rows, replacing cells with values from objects within the corresponding list in the model. In other words, the model must contain a list of objects from which rows will be generated (the number of rows will match the number of list elements). When generating a row, the values of the corresponding list object will be used.
Outputting Data to a Cell
Cells support full Freemarker processor syntax.
Construction:
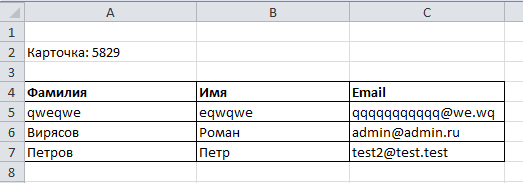
Карточка: ${name}
substitutes the value of the name variable at the specified location, taking it from the data model.
More complex constructs supported by the Freemarker processor can also be used.
<#if annotations??><#list annotations as annotation>"${annotation.annotation.ru}"<#sep>, </#list></#if>
Outputting an Arbitrary Number of Rows to the Template
To output an arbitrary number of rows as a table in the template, use the following construction:
At the position where the rows generated from the list of objects are expected, write the following construction in the first cell:
#LIST list_name
where list_name is the name of the variable in the model that contains the list of objects.
The following rows are structured the way we want them to be generated based on objects from the list_name list
For example:

In the rows, when filling cells, we use variable names from objects of this list (we can also use variables from the general model; if the variable names from the object and from the general model match, the value from the object will be used).
After the template rows are described, place the following construction in the first cell of a new row:
#END
It indicates that the rows after this point are not template rows and should not be generated.

Example
We have a data type with the following attributes:

The empls attribute is a list of system users.
For this type, we create a template with the following model:
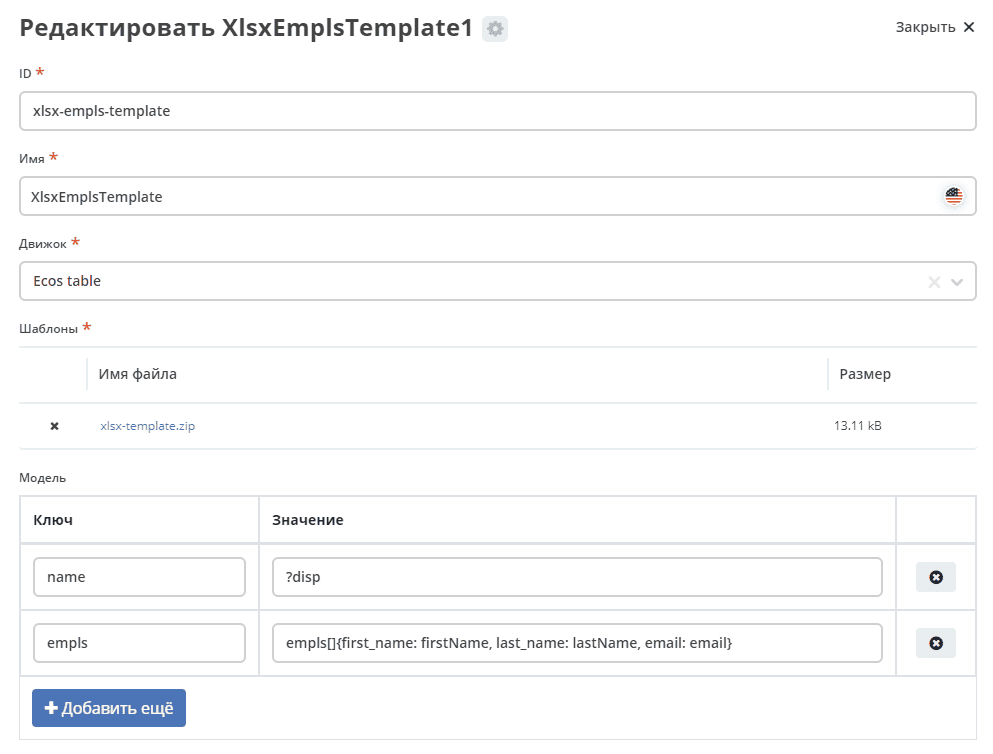
The empls variable stores a list of objects consisting of 3 fields, based on system users.
The xlsx template looks as follows:

Where:
In cell A2 we want to write the value from the model with the key name
In cell A5 we indicate that we want rows based on objects from the list with key empls in the model
In cells A6-C6 we specify how cells should be filled in the generated rows
In cell A7 we indicate that the template rows for the list with key empls end here (i.e., we can define 2 template rows and 2 rows will be generated for each list entry in the final file)
As a result, for a record with these parameters:
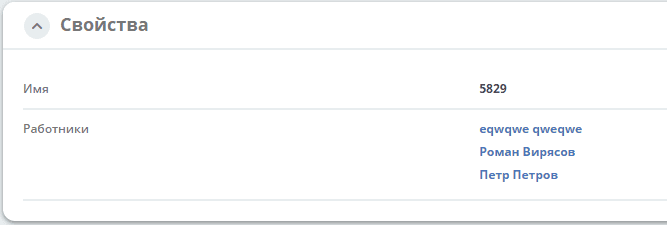
The following template will be generated: