OSGI Bundle Loading Functionality
Note
Available only in the Enterprise version.
Starting from version 1.16.0, the microservice has been enhanced with the capability to load custom code implemented according to the OSGI specification for bundles. This allows extending the microservice without altering its core functionality.
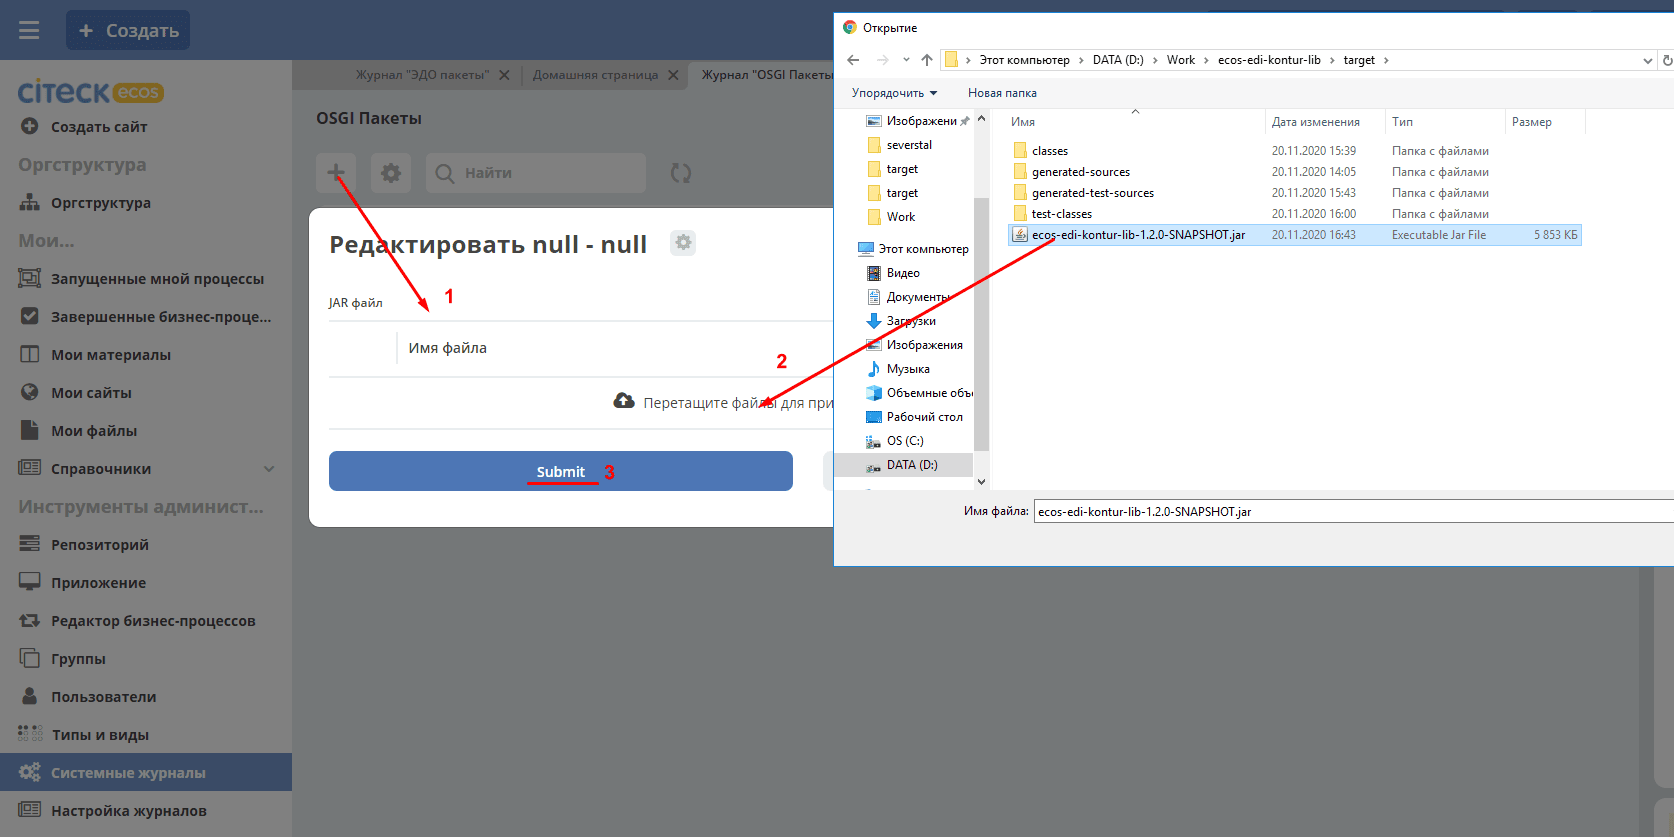
The loading of the bundles themselves is done via the OSGI Bundles journal in the administrator section. To load a bundle, navigate to this journal and click the create button. A modal window appears, prompting for file upload. Place your compiled jar file there and click Create. The bundle is loaded and installed if no issues occurred during installation. In the journal itself, you can always find the current status of the bundle, the name of the uploaded file, the symbolic name of the bundle, as well as download the bundle’s jar file.
What is available “out of the box” when implementing a new bundle:
The ApplicationContext of the ecos-integrations microservice, but you cannot work with it directly because bundles cannot “digest” the dependency on Spring libraries. Therefore, a wrapper was implemented in the ecos-osgi-loader library, which accepts the ApplicationContext object and allows retrieving beans from it.
Useful links for implementing OSGI bundles:
http://java-online.ru/osgi.xhtml – Description of OSGI operation with detailed examples of bundle implementation.
https://felix.apache.org/ – Official website of the Apache Felix framework, which was used as the OSGI specification implementation.
https://felix.apache.org/documentation/subprojects/apache-felix-maven-bundle-plugin-bnd.html – More detailed description of working with the plugin for creating OSGI bundles.
When implementing bundles, you do not need to include Felix and OSGI Core packages in your projects; simply add a dependency on ecos-osgi-loader. All necessary OSGI libraries will come from there, as well as the wrapper for working with the ApplicationContext.
Bundle build plugin version: 5.1.1
Example of a configured plugin:
<plugin>
    <groupId>org.apache.felix</groupId>
    <artifactId>maven-bundle-plugin</artifactId>
    <version>5.1.1</version>
    <extensions>true</extensions>
    <configuration>
        <instructions>
            <Bundle-SymbolicName>${project.groupId}.test-spring-bundle</Bundle-SymbolicName>
            <Bundle-Name>${project.name}</Bundle-Name>
            <Bundle-Version>${project.version}</Bundle-Version>
            <Bundle-Activator>${project.groupId}.TestSpringAppActivator</Bundle-Activator>
            <Import-Package>org.osgi.framework.*</Import-Package>
            <Export-Package>org.apache.*, org.slf4j.*, ru.citeck.*, lombok.*</Export-Package>
        </instructions>
    </configuration>
</plugin>
Example of Creating a Bundle
This article will cover the step-by-step creation of a bundle, as well as the integration of this bundle into the integrations microservice.
Example we will consider - ecos-edi-kontur-lib
1. Build
A Bundle is a standard jar file with the addition of a MANIFEST.MF file.
To get such a build, do the following:
1.1. Set the packaging property in pom.xml to bundle. Example with context:
<project xmlns="http://maven.apache.org/POM/4.0.0"
        xmlns:xsi="http://www.w3.org/2001/XMLSchema-instance"
        xsi:schemaLocation="http://maven.apache.org/POM/4.0.0 http://maven.apache.org/xsd/maven-4.0.0.xsd">
...
    <groupId>ru.citeck.ecos</groupId>
    <artifactId>ecos-edi-kontur-lib</artifactId>
    <version>1.2.0-SNAPSHOT</version>
    <packaging>bundle</packaging>
...
</project>
1.2. Specify the following plugin in the build section (I ended up with a rather large configuration):
It’s worth dwelling in more detail on the configuration of this plugin. A Bundle has its own ClassLoader, which depends on other bundles. The rules of ClassLoader inheritance in Java do not apply to it. For this reason, for a class from some library to be available in your bundle, it must be imported (and another bundle, accordingly, must export it). If there is no import, a ClassNotFoundException or NoClassDefFoundError will occur at runtime (depending on the context of the request to the class). If there is an import, but such a dependency cannot be found in the framework from other bundles (none exported it) - an exception about dependency resolution (wiring) will occur when starting the bundle.
The comments in the xml should make it clear what is what. I will describe some of the pitfalls.
There are situations where a bundle complains about a missing dependency at startup, but you just loaded that dependency in another bundle (or this dependency exists in the system bundle). This problem can occur because the dependency was exported without a version (or with the default version 1.0.0) due to the lack of this information at export runtime, while the import requires, for example, 25.1.0. An example solution to such a problem could be specifying the minimum supported version yourself in the manifest. To do this, instead of the import line com.google.common.*, write the following: com.google.common.*; version="[1.0,26.0)", which means we will accept any version from 1.0.0 to 26.0.
1.3. The build itself, after the previous preparations, is performed with the standard command mvn clean package (install|deploy)
2. Activator
An Activator is analogous to a main method for a bundle. It is called when the bundle starts and when it stops (start and stop methods).
The library from the example is used to create objects and register them in the microservice. Registration here means adding the Diadoc and Kontur.EDI event processing services under the key KONTUR. Thus, by connecting the bundle, we can use event processing (and other features of the library) from the microservice.
3. Loading into the Microservice
Go to Workspace “Administrator Section” → OSGI Bundles Journal. Load your bundle via the + button.
If everything is OK, we will see the following:
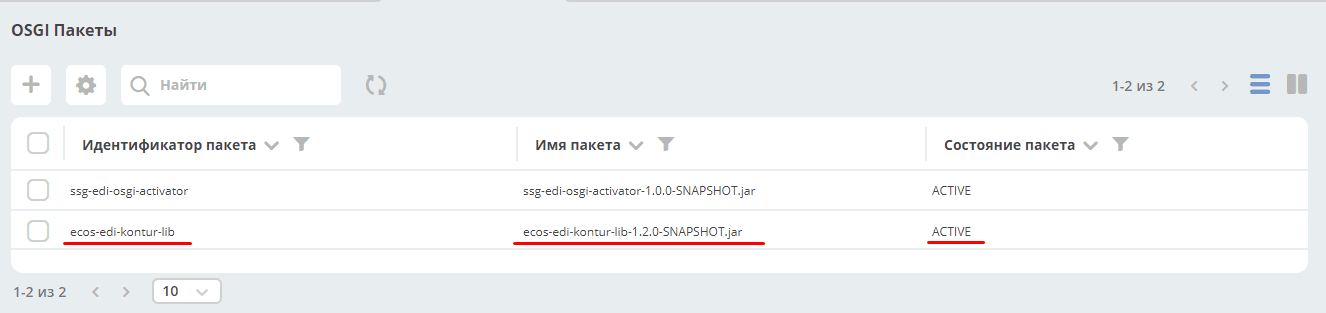
An important fact is that the status is ACTIVE, which means the bundle is resolved, installed, and the framework has successfully started it.
If there is a loading error, it is necessary to correct either the code or the bundle settings (import and export).
Be sure to check that there are no runtime errors when the bundle is running. As written above, missing imports can lead to runtime errors.
Important
If you get an error, fix the bundle, load a new bundle, and get the same error - restart the integrations microservice after each unsuccessful bundle start.
Ways to Extend the Integrations Microservice Using Bundles
1. Registering Your Own RecordsDao
Preparatory part - import the records dependencies using Maven in your bundle.
Import packages into the bundle (in the config):
kotlin.*,
ecos.com.fasterxml.jackson210.*,
ru.citeck.ecos.records2.*,
ru.citeck.ecos.records3.*,
ru.citeck.ecos.commons.*
Next - write a RecordsDao according to your needs.
After writing - in the BundleActivator, you can use ApplicationContextReflection to get the bean of the RecordsService class and call its register method, passing your RecordsDao.
Now, requests for the specified sourceId will go to your RecordsDao.
2. Registering New Commands
Preparatory part - import the commands dependencies using Maven in your bundle.
Import packages into the bundle (in the config):
ecos.com.fasterxml.jackson210.*,
kotlin.*,
ru.citeck.ecos.commons.*,
ru.citeck.ecos.commands.*
Next, declare your CommandDto, specify its type with the @CommandType annotation. Create a CommandExecutor for this DTO.
After writing - in the BundleActivator, you can use ApplicationContextReflection to get the bean of the CommandsService class and call its addExecutor method, passing your implementation of CommandExecutor.
Now, commands with the specified type will go to your CommandExecutor.
3. Ability to Work with Camel
This is mainly used so far for EDI integrations, but sometimes it’s easier to use Camel for certain things.
To use it - add the necessary Camel dependencies using Maven in your bundle.
Import packages into the bundle (in the config):
org.apache.camel.*
Next - in the BundleActivator, create a DefaultCamelContext. Add the necessary routes to it. Start the context.
Now you have Camel running in your bundle. Camel allows not only exchanging messages within the context but also within the JVM, which can be especially useful (direct-vm component).
Camel capabilities like dynamically adding endpoints, etc., have not been tested yet, but it is very convenient to reach RabbitMQ or other services (outgoing request).
4. Registering a New Endpoint
Add the dependency:
<dependency>
<groupId>org.springframework</groupId>
<artifactId>spring-webmvc</artifactId>
<version>5.0.12.RELEASE</version>
<scope>provided</scope>
</dependency>
Add to the import packages:
org.springframework.web.*,
org.springframework.http.*
In the bundle, create class(es) containing methods for processing requests.
Possible implementation options for such a method include using RequestEntity, ResponseEntity, using @RequestBody, example. Also, methods can accept request path variables @PathVariable and header variables @RequestHeader.
In the start method of the activator, using ApplicationContextReflection, get the RequestMappingHandlerMapping, configure the RequestMappingInfo.BuilderConfiguration, create a RequestMappingInfo, and register it in the RequestMappingHandlerMapping. Example for registering a new endpoint "ecos/message":
RequestMappingHandlerMapping requestMappingHandlerMapping = ApplicationContextReflection.getBean(RequestMappingHandlerMapping.class);
handlerMapping = (AbstractHandlerMethodMapping) requestMappingHandlerMapping;

RequestMappingInfo.BuilderConfiguration config = new RequestMappingInfo.BuilderConfiguration();
config.setUrlPathHelper(requestMappingHandlerMapping.getUrlPathHelper());
config.setPathMatcher(requestMappingHandlerMapping.getPathMatcher());
config.setSuffixPatternMatch(requestMappingHandlerMapping.useSuffixPatternMatch());
config.setTrailingSlashMatch(requestMappingHandlerMapping.useTrailingSlashMatch());
config.setRegisteredSuffixPatternMatch(requestMappingHandlerMapping.useRegisteredSuffixPatternMatch());
config.setContentNegotiationManager(requestMappingHandlerMapping.getContentNegotiationManager());

RequestMappingInfo.Builder builder = RequestMappingInfo
                .paths("ecos/message")
                .methods(RequestMethod.POST)
                .consumes(MediaType.APPLICATION_JSON_VALUE)
                .produces(MediaType.APPLICATION_JSON_VALUE);

RequestMappingInfo requestMappingInfo = builder.options(config).build();
handlerMapping.registerMapping(requestMappingInfo, controller, DocumentController.class.getDeclaredMethod("postLoad", String.class, CreateDocsRequest.class));
In the stop method, provide for disabling the endpoint by calling handlerMapping.unregisterMapping(info).
To modify records in Citeck, you can use RecordsService. There are the following specifics when working with the service via DTO:
Creating ObjectData from a DTO object:
ObjectData targetAttributesData = ObjectData.create(dtoObject);
To use an alias for properties, you can use
ecos.com.fasterxml.jackson210.annotation.JsonProperty
@JsonProperty("nsdb_author")
private String author;
...
ObjectData targetAttributesData = ObjectData.create(dtoObject);
Property of type
ASSOC: private RecordRef nsdb_counterparty
ObjectData targetAttributesData = ObjectData.create();
targetAttributesData.set("nsdb_counterparty", assocRecordRef);
RecordAtts recordAtts = new RecordAtts(targetRecordRef, targetAttributesData);
RecordRef result = recordsService.mutate(recordAtts);
Property of type
CONTENT: private ObjectData nsdb_content
ObjectData contentData = ObjectData.create();
contentData.set("mimetype", "application/xml");
contentData.set("filename", filename);
contentData.set("base64content", base64content.getBytes());
nsdb_content = contentData;
Possible properties to set for ru.citeck.ecos.records.source.alf.file.FileRepresentation
Reference to the parent from ASSOC
@AttName("_parent?id")
RecordRef parentRef;
Declaring a property that is based on an attribute of a type with a colon (cm:name, idocs:inn)
@AttName("idocs:inn")
private String inn;
@AttName("idocs:fullOrganizationName")
private String organizationName;
Specifying a specific alfresco-type for the parent when creating a record
targetAttributesData.set(AlfNodeRecord.ATTR_TYPE, "dl:dataListItem");
RecordAtts recordAtts = new RecordAtts(targetRecordRef, targetAttributesData);
RecordRef result = recordsService.mutate(recordAtts);
where ru.citeck.ecos.records.source.alf.meta.AlfNodeRecord.ATTR_TYPE = “type“
Specify a specific association type between the parent and the child record
targetAttributesData.set(RecordConstants.ATT_PARENT_ATT, "icase:documents");
RecordAtts recordAtts = new RecordAtts(targetRecordRef, targetAttributesData);
RecordRef result = recordsService.mutate(recordAtts);
where ru.citeck.ecos.records2.RecordConstants.ATT_PARENT_ATT = “_parentAtt“;
Testing the functionality of methods can be done by implementing the RecordMutateDao, RecordAttsDao, RecordsQueryDao interfaces in a test and simulating the work of RecordsService, for example:
RecordsServiceFactory recordsServiceFactory = new RecordsServiceFactory() {
    @Override
    protected RecordsProperties createProperties() {
        RecordsProperties properties = super.createProperties();
            properties.setAppInstanceId("162037");
            properties.setAppName("alfresco");
            return properties;
        }
    };
recordsServiceFactory.getRecordsServiceV1().register(this);
RecordsService recordsService = recordsServiceFactory.getRecordsServiceV1();
where this implements RecordMutateDao, RecordsQueryDao.
Specifics
Simultaneous use of JsonProperty and AttName annotations results in the property not being populated when reading the DTO from RecordsService.
@JsonProperty("nsdb_author")
@AttName("nsdb_author")
private String author;
...
RecsQueryRes<Dto> docRes = recordsService.query(query, Dto.class);
...
System.out.println(queryResultDto.getAuthor());
Will print null to the console.