Implementation Examples
Local Data Import from Excel to Citeck
Simple Example
This example is suitable for simple cases where the import data contains no associations, no mapping is required, and a simplified file format works for you.
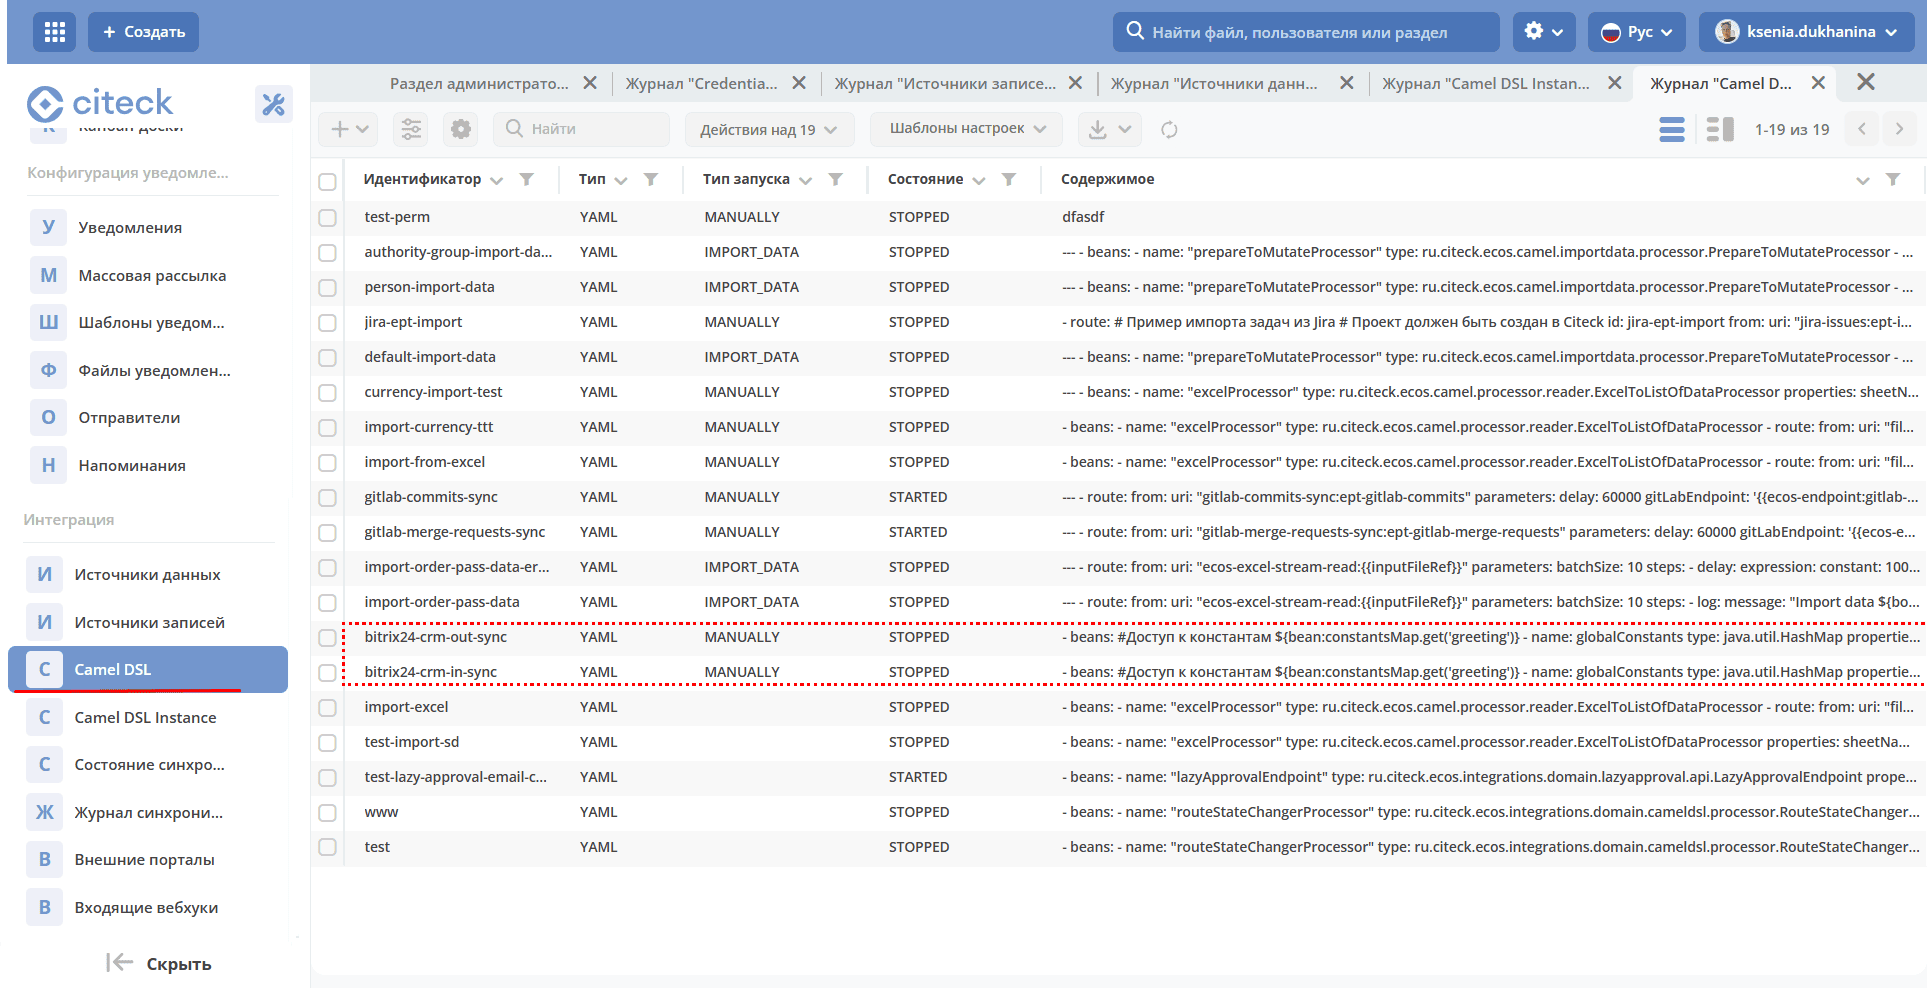
In the Administrator Section workspace → Integration → Camel DSL, click “+”:
Fill in the fields in the form:
id: import-from-excel (you can set your own. The main thing is that the id is unique among all Camel DSLs)
Type: Yaml
State: Stopped
File: you will need to upload an Excel file with data here (see example below). This can be done later.
Context Content:
- beans:
    - name: "excelProcessor"
      type: ru.citeck.ecos.camel.processor.reader.ExcelToListOfDataProcessor
- route:
    from:
      uri: "file-from-camel-dsl:import"
      steps:
        - process:
            ref: excelProcessor
        - split:
            simple: "${body}"
            steps:
              - to: "ecos-records-mutate:?sourceId=emodel/import-test"
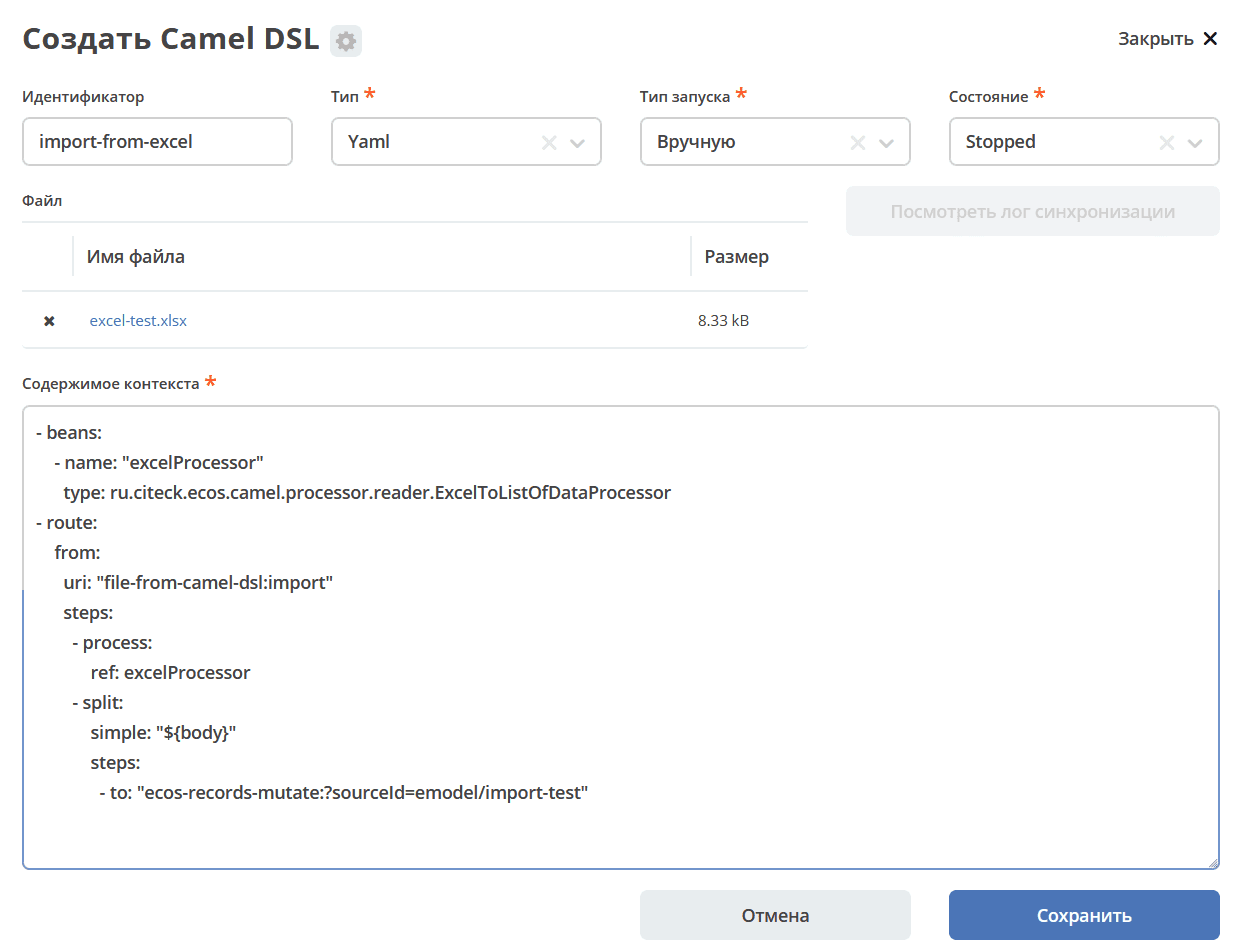
In the content, you only need to change import-test to the sourceId for your type. By default, sourceId equals the type id.
Save.
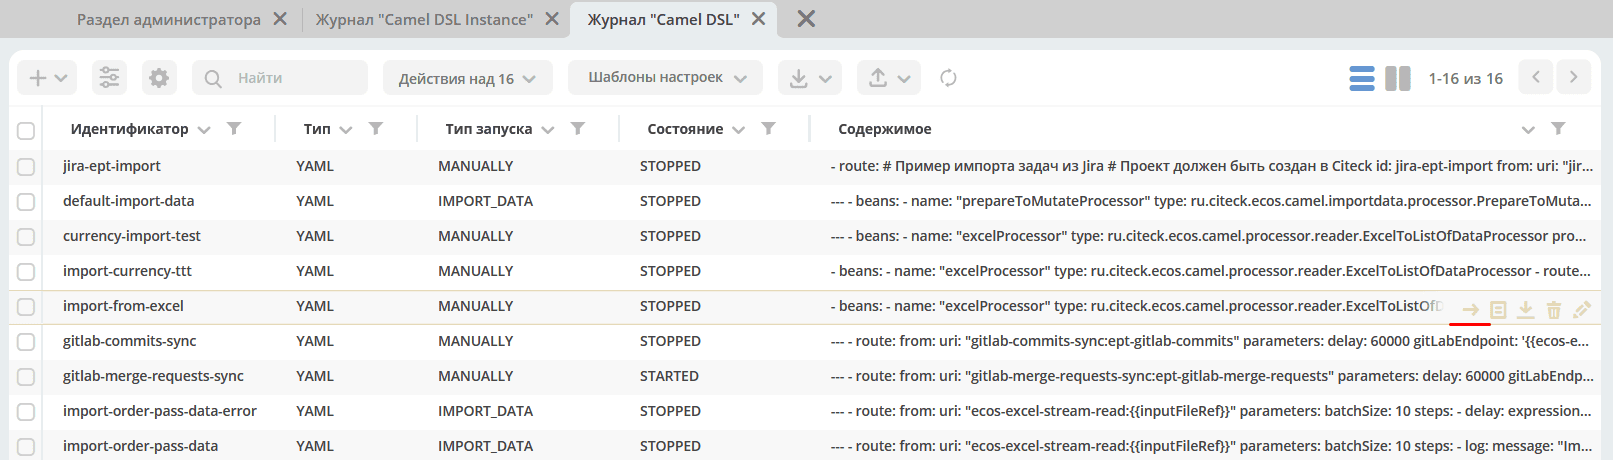
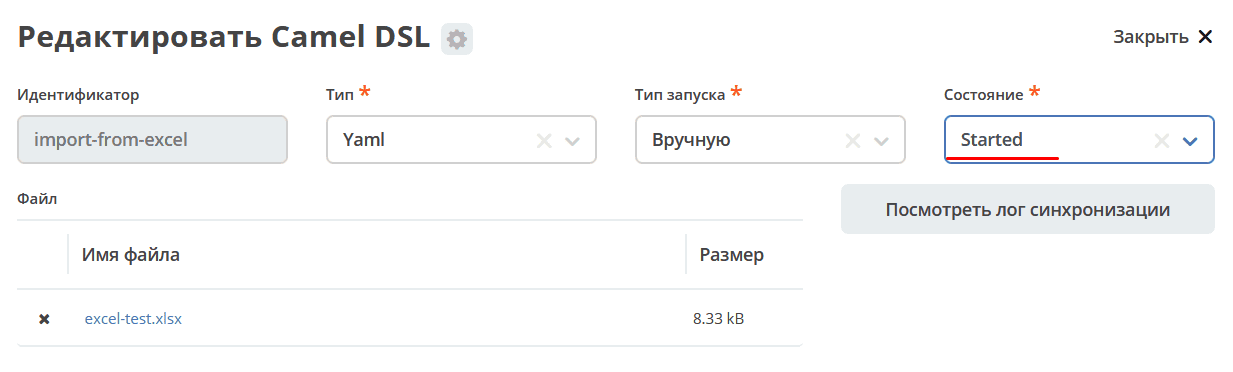
If the data file is already attached, all that remains is to start it via an action in the journal or by changing the state Stopped -> Started on the edit form:
|
|
In the file:
The first row contains attribute ids.
The remaining rows contain the data to be imported.
More Complex Example
This example is suitable for complex cases (adding mapping, working with associations, working with non-trivial Excel file formats).
This example demonstrates a route using the following Camel elements:
MappingProcessor
Let’s assume there are two custom data types in the system — Employee and Position.
Employee:
Position (reference type, is an association in the Employee type):
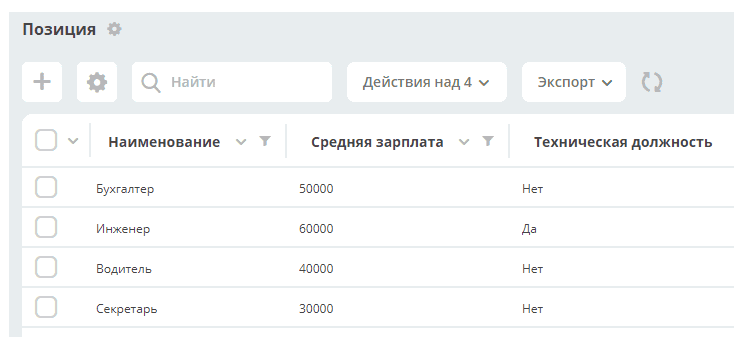
The following data needs to be imported from an Excel file (xlsx):
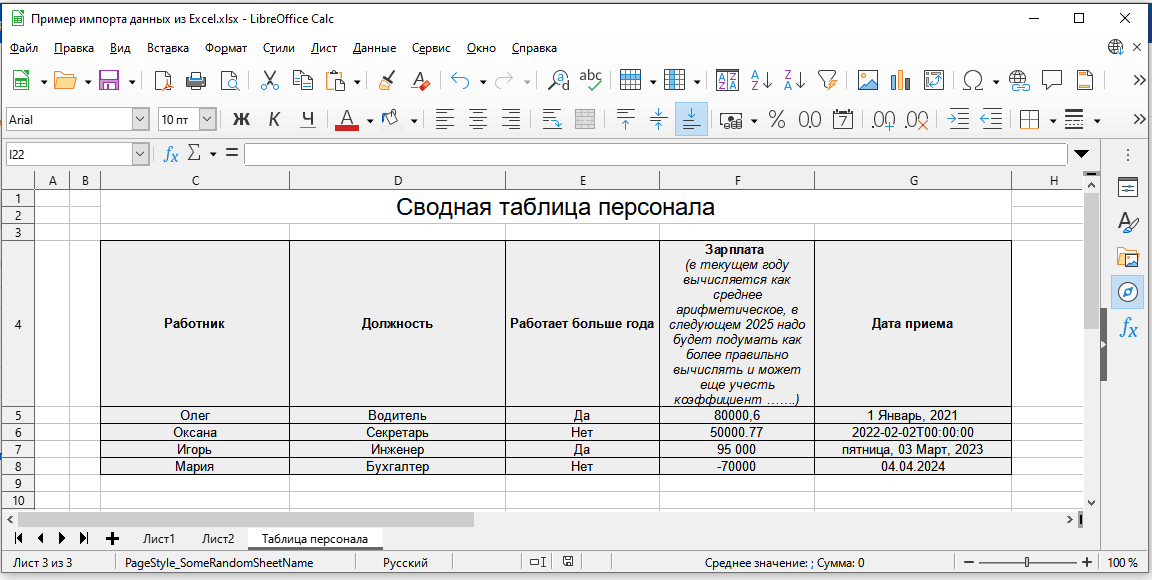
Comments on the table columns:
Employee — no additional processing required. The value will be written as a string.
Position — here it is clear that the table uses the “Name” property (system name ‘name’) of the association with the Position type. To correctly save to the system, it will be necessary to determine the RecordRef of the position.
Works more than a year — a boolean value that must be converted to the appropriate true/false before saving to the system.
Salary — a numeric value. Different recording options are shown: with digit grouping, using dot and comma as separators, negative numbers (just for example). The header text hints that it might be edited periodically. Apart from working with the header, no additional processing of numeric values will be required. They will be correctly written as the corresponding numeric values.
Hire Date — this column in the table has the Date type and different formatting types are shown as an example. No additional value processing will be required.
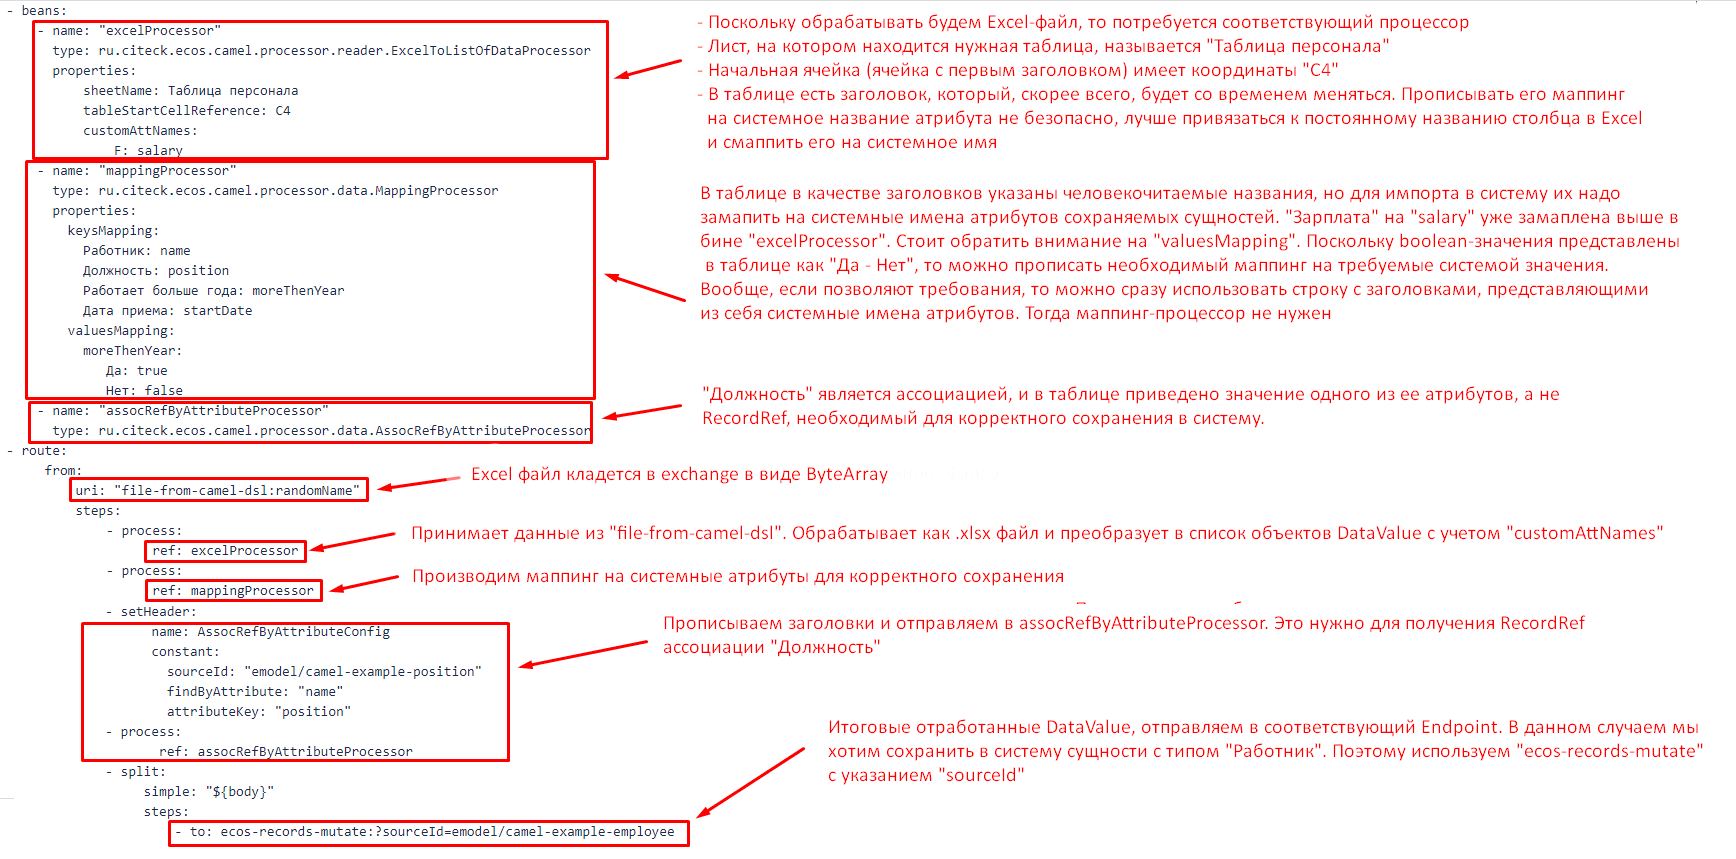
To import the data, you will need to attach an Excel file to the Camel DSL form and write the following configuration:
- beans:
    - name: "excelProcessor"
      type: ru.citeck.ecos.camel.processor.reader.ExcelToListOfDataProcessor
      properties:
          sheetName: Таблица персонала
          tableStartCellReference: C4
          customAttNames:
              F: salary
    - name: "mappingProcessor"
      type: ru.citeck.ecos.camel.processor.data.MappingProcessor
      properties:
        keysMapping:
          Работник: name
          Должность: position
          Работает больше года: moreThenYear
          Дата приема: startDate
        valuesMapping:
          moreThenYear:
             Да: true
             Нет: false
    - name: "assocRefByAttributeProcessor"
      type: ru.citeck.ecos.camel.processor.data.AssocRefByAttributeProcessor
- route:
     from:
         uri: "file-from-camel-dsl:randomName"
         steps:
             - process:
                   ref: excelProcessor
             - process:
                   ref: mappingProcessor
             - setHeader:
                   name: AssocRefByAttributeConfig
                   constant:
                     sourceId: "emodel/camel-example-position"
                     findByAttribute: "name"
                     attributeKey: "position"
             - process:
                    ref: assocRefByAttributeProcessor
             - split:
                  simple: "${body}"
                  steps:
                      - to: ecos-records-mutate:?sourceId=emodel/camel-example-employee
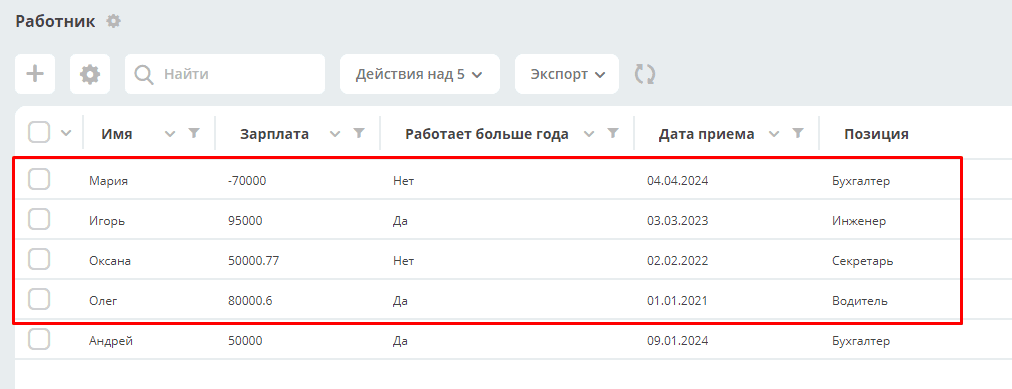
Comments:
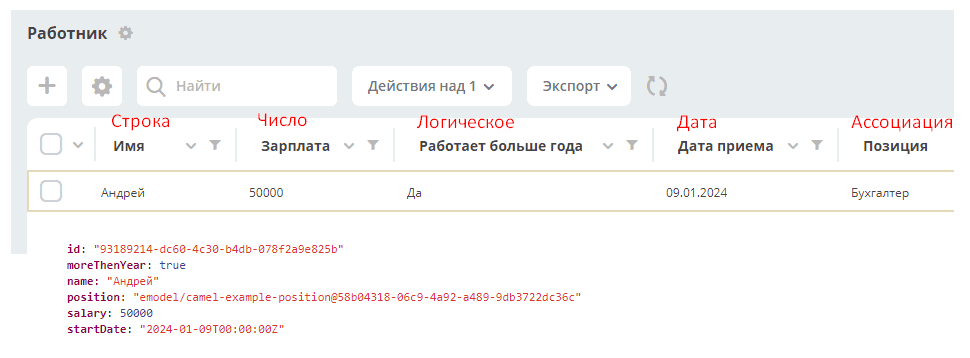
After import we get:
Bitrix24 – CRM Synchronization
Camel DSL Configs
In the Administrator Section workspace → Integration → Camel DSL, 2 Camel DSL configs were created:
bitrix24-crm-in-sync — Incoming integration. From Bitrix24 to Citeck CRM.
For the Incoming integration, a webhook bitrix24-webhook was created, through which requests from Bitrix24 for creating or updating Deals are received. The Incoming integration in Deals uses the bitrixId attribute to determine which deal to update.
When creating a deal from Bitrix24, this attribute is set immediately. When updating in Bitrix24, if there is no deal with such an id in Citeck CRM, it is created as new.
bitrix24-crm-out-sync — Outgoing integration. From Citeck CRM to Bitrix24.
The Outgoing integration synchronizes the creation and updating of deals to Bitrix24.
Attributes that are synchronized in the current implementation:
Attribute in Citeck CRM deal |
Attribute in Bitrix24 |
Comment |
|---|---|---|
bitrixId |
ID |
|
name |
TITLE |
|
amount |
OPPORTUNITY |
|
dateReceived |
DATE_CREATE |
|
company |
crm.company.get?id=COMPANY_ID -> TITLE |
COMPANY_ID stores the ID of the Company associated with the Deal. |
manager |
user.get?id=ASSIGNED_BY_ID |
ASSIGNED_BY_ID stores the ID of the deal manager.
We get the user’s email from Bitrix24, and if a user is found in the system by this value, we set them as the manager.
|
contacts |
Contacts in Bitrix24 are stored in separate entities.
We get a list of contact ids and for each id we get the contact data
|
|
contactFio |
LAST_NAME NAME SECOND_NAME |
Formed from several fields in Bitrix24 |
contactPhone |
contact.PHONE |
|
contactEmail |
contact.EMAIL |
Setting up synchronization with Bitrix24
For the synchronizations to work, you need to configure Bitrix24, Endpoints, Secrets, and the Incoming webhook:
In Bitrix24, create an Outgoing webhook (for incoming integration). See details how
1.1 In URL, specify the address to the Incoming webhook created in Citeck, of the form
http://host/gateway/integrations/pub/webhook/bitrix24-webhook?token=testAuthToken
bitrix24-webhook — the id specified when creating the webhook.
token — the parameter that was set on the form.
testAuthToken — the token itself that was set in the Secret.
1.2 In Events, you must specify Deal Creation (ONCRMDEALADD), Deal Update (ONCRMDEALUPDATE)
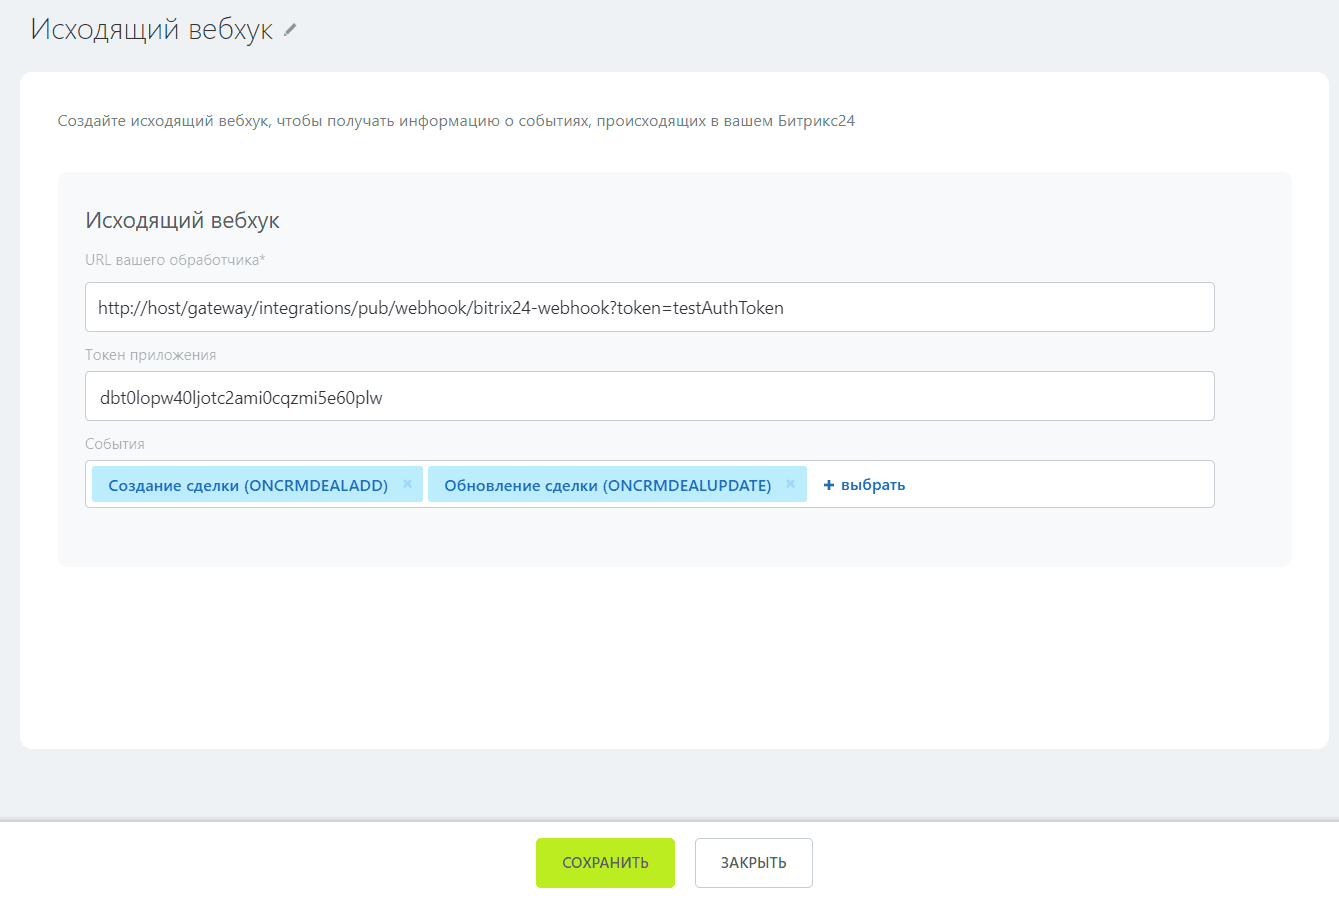
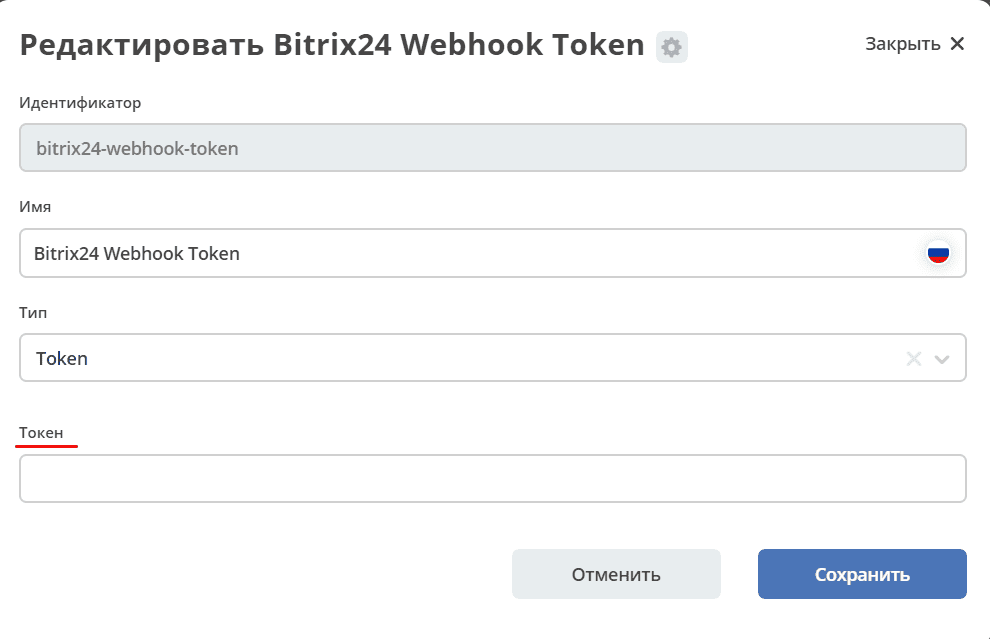
1.3 In Citeck, go to Administrator Section workspace → Model → Secrets and in bitrix24-webhook-token specify the Application Token.
In Bitrix24, create an Incoming webhook (for requests to Bitrix24).
2.1 Specify the rights settings crm and user
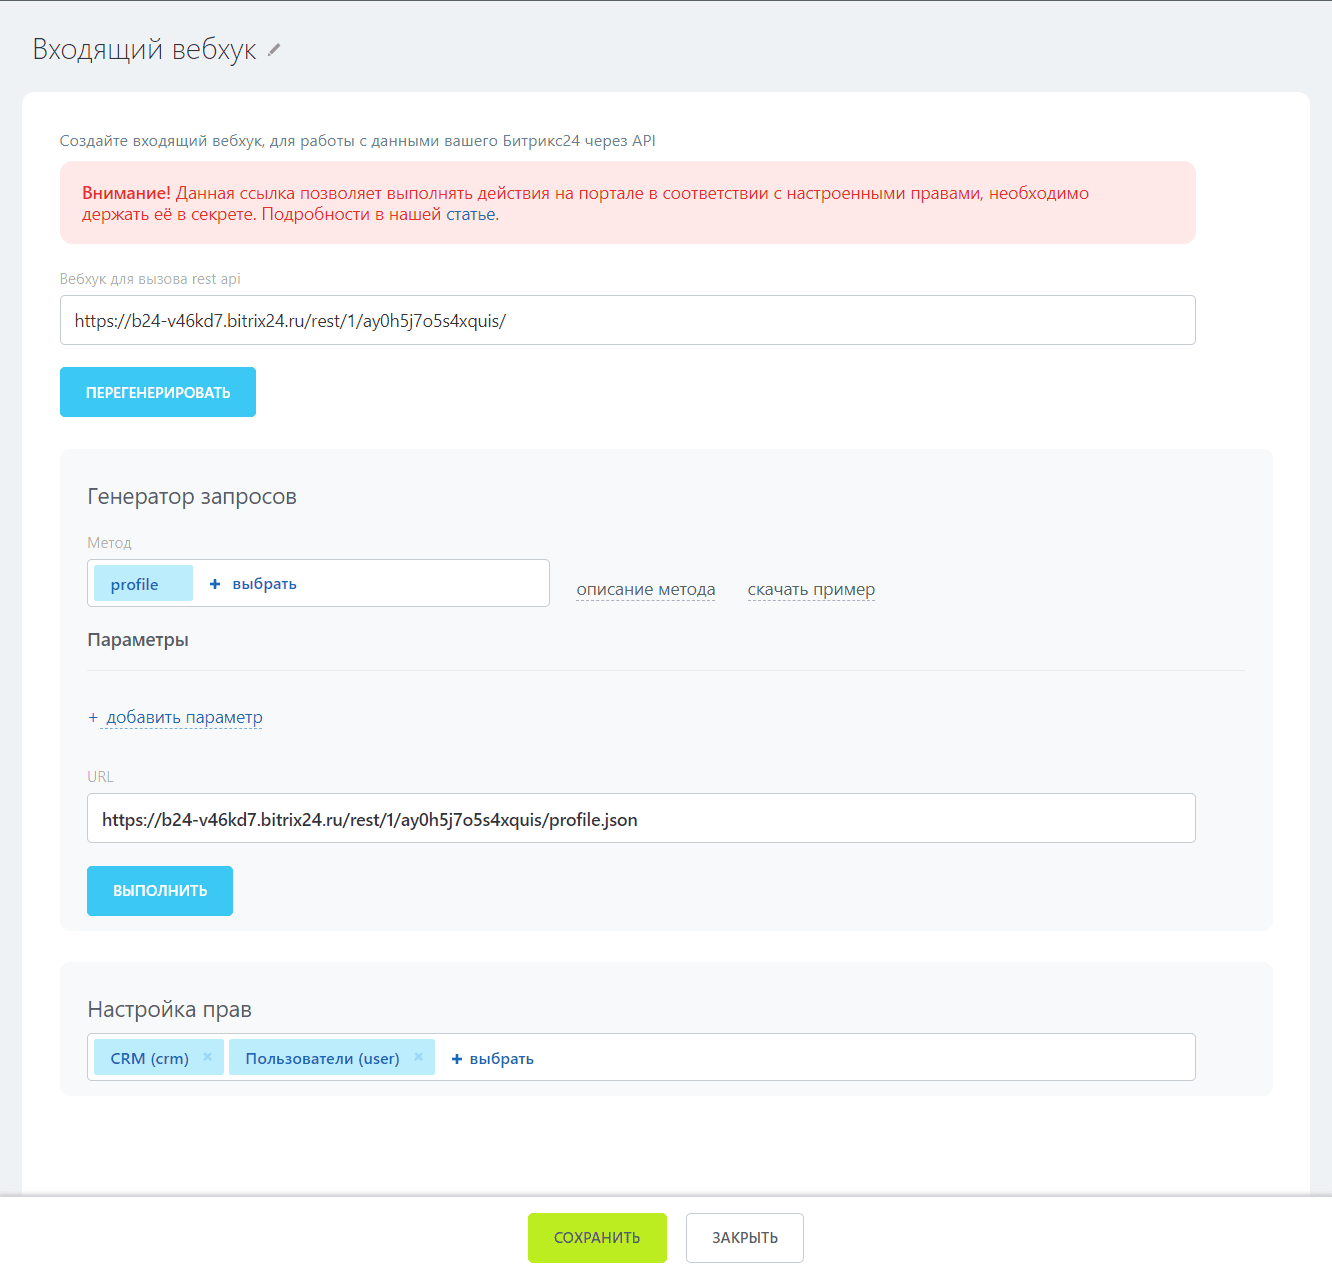
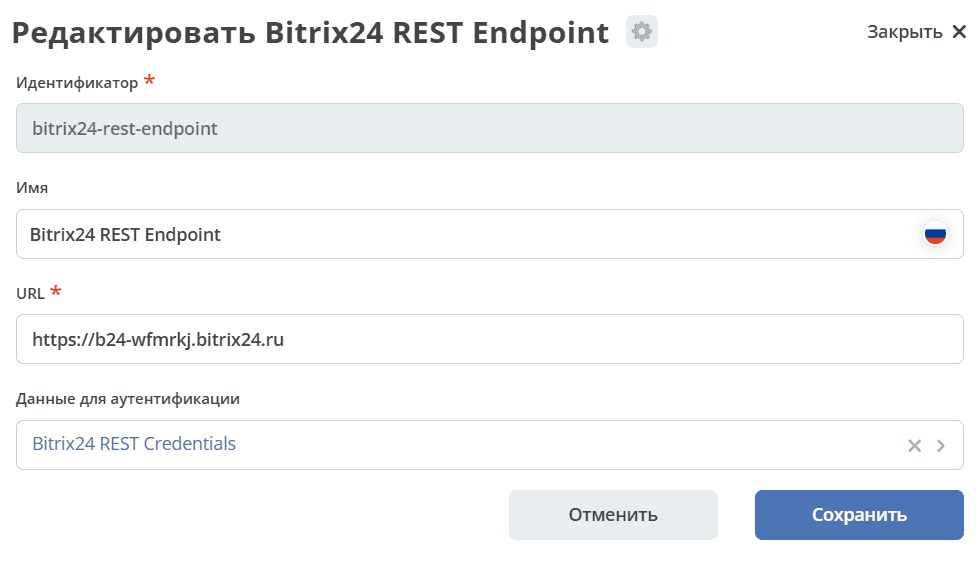
2.2 In Citeck, go to Administrator Section workspace → Model → Endpoints and in bitrix24-rest-endpoint specify the URL of the Bitrix24 Incoming webhook of the form https://<your-subdomain>.bitrix24.ru/rest/ (replace <your-subdomain> with the subdomain of your Bitrix24 portal)
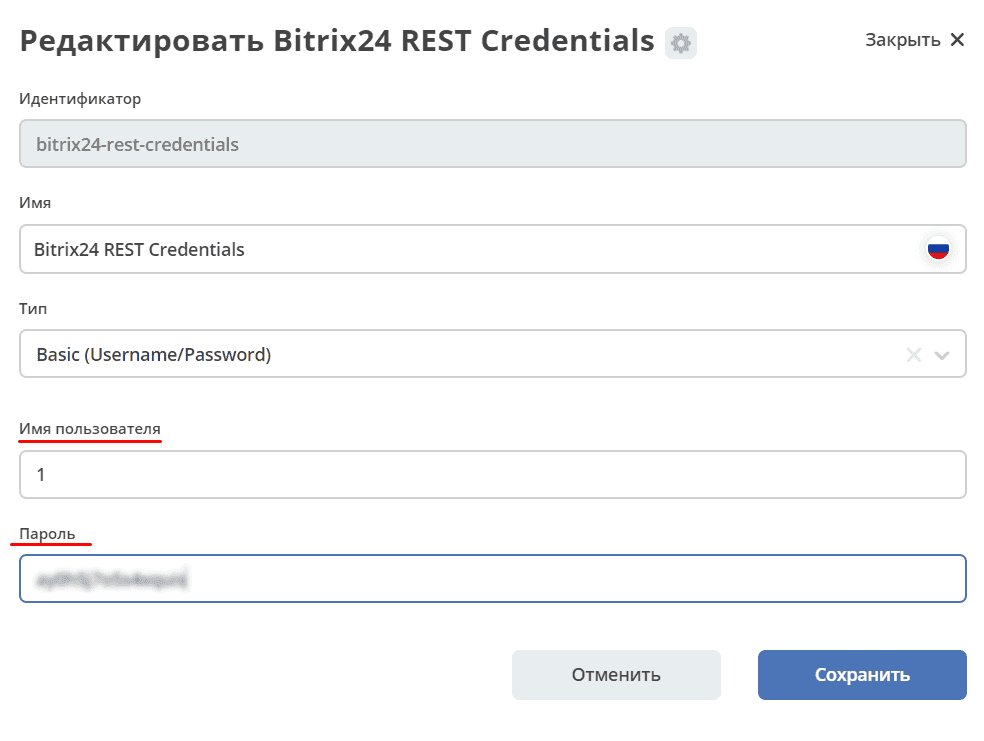
2.3 In Citeck, go to Administrator Section workspace → Model → Secrets and in bitrix24-rest-credentials specify the Username and Password (values from the Bitrix24 Incoming webhook URL …./rest/{username}/{password})
In Citeck, go to Administrator Section workspace → Model → Endpoints and in bitrix24-rabbitmq-endpoint specify the URL to RabbitMQ via AMQP:

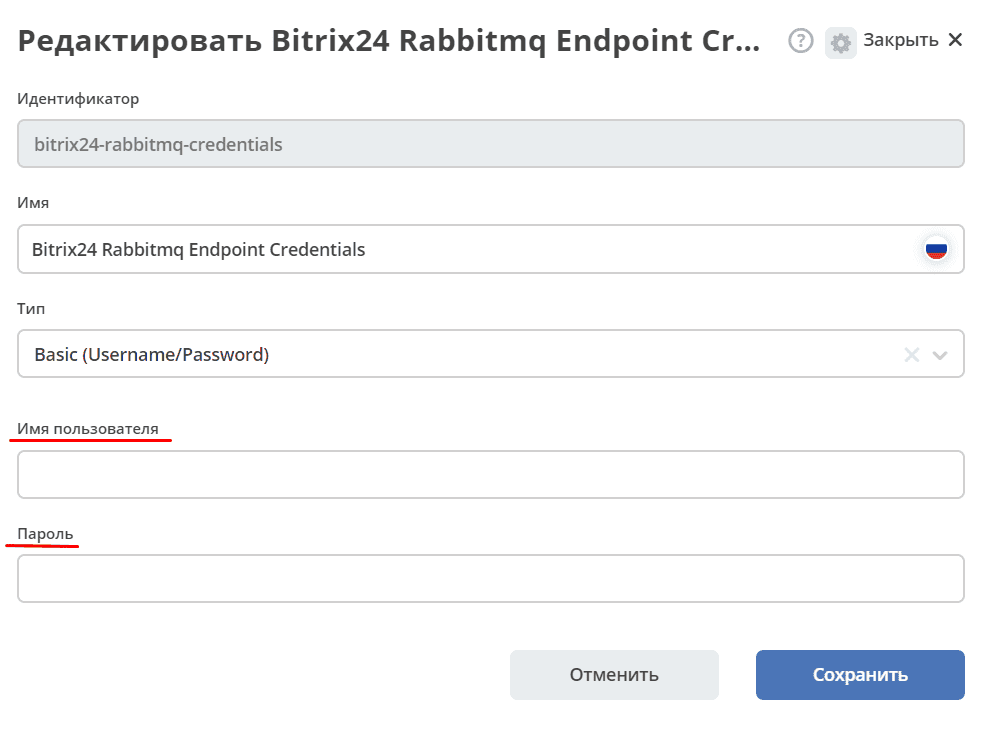
In Citeck, go to Administrator Section workspace → Model → Secrets and in bitrix24-rabbitmq-credentials specify the Username and Password for authentication in RabbitMQ. The user must have administrator rights.
Start the synchronizations bitrix24-crm-in-sync, bitrix24-crm-out-sync in Camel DSL.
Global Data Import
Note
The default import is already configured in the system — more details about its functionality.
The ability to add an “Import” button to the journal of the required type. When clicked, a list of possible template options appears, where the user first downloads the template to Excel, fills in the data, and uploads the file back to the System.
After the file processing is completed, the user is shown a message about the completion of the process and the status (Success/Error), and cards of a certain type are created in the system.
To set up a custom Data Import, you need to perform the following steps:
1) In the Administrator Section workspace → Integration → Camel DSL, create a Camel DSL and describe the file processing process in it.
Launch Type must be set to Data Import.
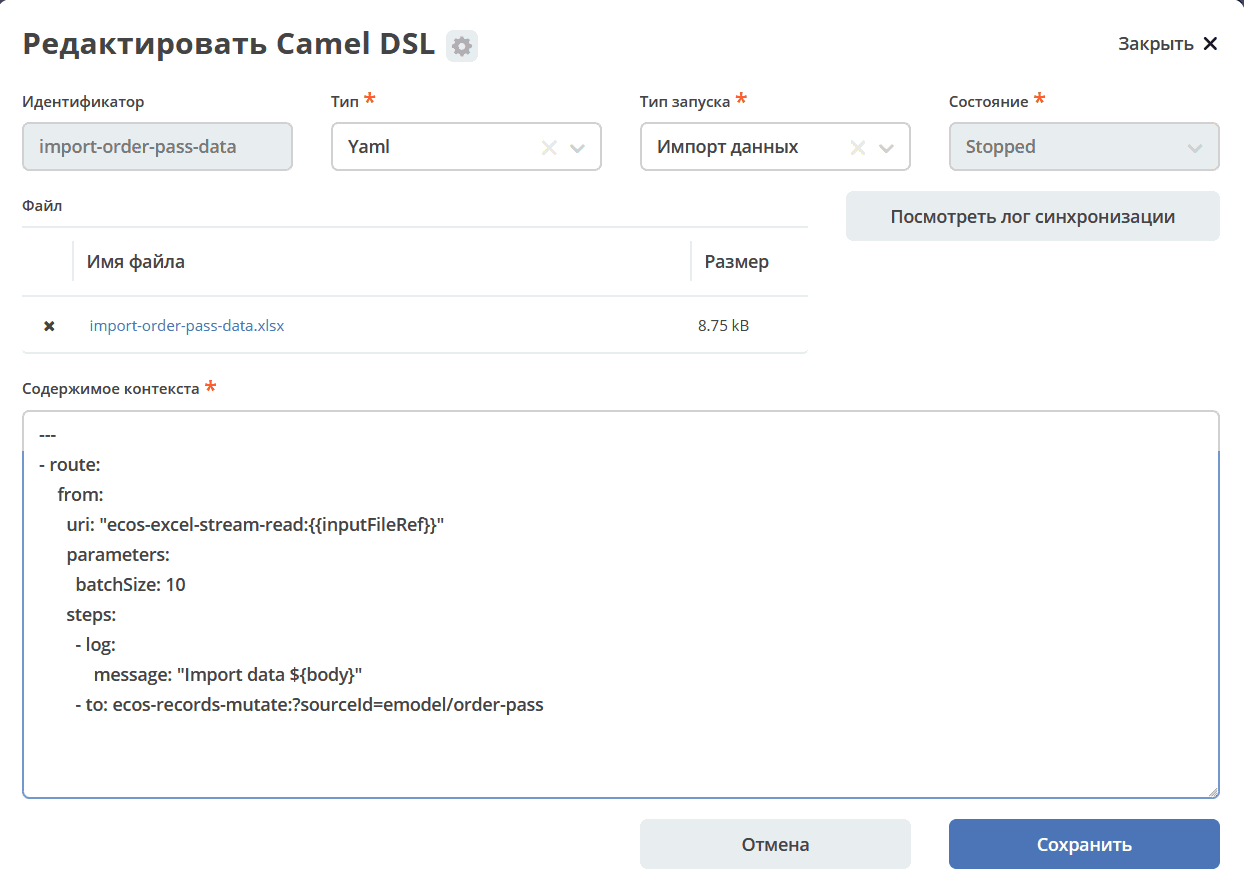
Example config for data import:
---
  - route:
      from:
        uri: "ecos-excel-stream-read:{{inputFileRef}}"
        parameters:
          batchSize: 10
          customAttNames:
              Название: title
              Описание: description
        steps:
          - log:
              message: "Import data ${body}"
          - to: ecos-records-mutate:?sourceId=emodel/order-pass
The import config for the “Default” option - default-import-data is already configured in the system.
When describing file processing in Camel DSL, the ecos-excel-stream-read endpoint should be used. It is intended for streaming reading of XLSX files.
Accepts the file’s recordRef and a number of parameters as input:
batchSize — number of rows to process on each iteration (default = 100);
sheetName — name of the sheet in the file;
headRowNumber — the row number where the header starts;
customAttNames — list of header mappings.
When starting the import, the following parameters are available in the Camel context:
inputFileRef — recordRef of the file that was passed to the import form;
user — recordRef of the user who started the import;
typeId — localId of the data type.
If the default-import-data option is used:
sourceId — sourceId from the data type;
customAttNames — mapping of attributes from types in the form {name: id, ……}
assocMapping — list of association mappings specified in the aspect
2) If necessary, attach a file template in Camel DSL
An import file template for the user can be attached in Camel DSL, then the user will be able to download it when selecting the option in the journal and fill it out.
When the import form is submitted, a separate instance of the Camel context is created, which was specified in the option. The instance state can be tracked in the Camel DSL Instance journal v2/journals?journalId=ecos-camel-dsl&viewMode=table&ws=admin$workspace
3) Add the import-data-config aspect (Data Import) to the required data type and configure the option by specifying the Camel DSL created in the previous step.